Monthly Archives: June 2014

How To Use Flash Triggers

Flash trigger

Flash trigger with flash attached

Do you want to learn to use your flash off the camera? And make a huge improvement in your flash photography? In this post we look at how to use flash triggers.

What are flash triggers? Flash triggers are small accessories which allow you to place your flash off your camera (they need to be within the triggers range). When you have learnt to use these, you will no longer be restricted to having the flash sitting on top of the camera. If you want the flexibility to create directional light with your flash – read on for how to use flash triggers.


How to use flash triggers?

Flash triggers are sold singly or in pairs. To get started, you need a pair of them. The flash is mounted on top of one trigger as in the picture on the right.

The other fits into the shoe on top of your camera – as shown in the second image.

These images show the flash triggers which I use – they are called Cactus Flash Triggers V5. A pair of these triggers currently costs A$90 at the online store I use.

Flash trigger

Flash trigger attached to the camera

What settings to use?

Each trigger has a small switch on the left hand side (see the image on the left and the picture below).

The trigger which sits on top of your camera needs to be set to Tx – which stands for transmitter. The one which has the flash on it needs to be set to Rx – which stands for receiver.

When you press the shutter it sends a message to the transmitter, which sends a pulse to the receiver, which then fires the flash.

Flash trigger

Set the trigger attached to the flash to Rx

There is a further switch on the right hand side of the trigger (not shown in the images here). It has a number which relates to a channel. Make sure you have both your transmitter and receiver set to the same channel so they can “talk” to each other. For example, set them both to number 7.

The flash triggers use standard AAA size batteries.

When to use flash triggers?

Flash triggers have many uses. I use mine most often in the studio for additional light, at weddings to create directional light, to light interiors when photographing rooms, and in my stock photography work.

I wrote an earlier post on how to create images with white backgrounds which makes use of flash triggers.

Has this post been useful to you? Has it demystified flash triggers and off camera flash? Has it given you confidence to give it a try? Do you have any questions about flash triggers?


Creative Cropping

This post covers a way to achieve different visual effects with one image by use of creative cropping. Today, achieving different effects is straight forward – if you are not an expert in photoshop or lightroom, there are lots of simple smart phone apps you can use to crop and adjust your images.

Show me some images!

In this post we will look at one image, adjusted using creative cropping.

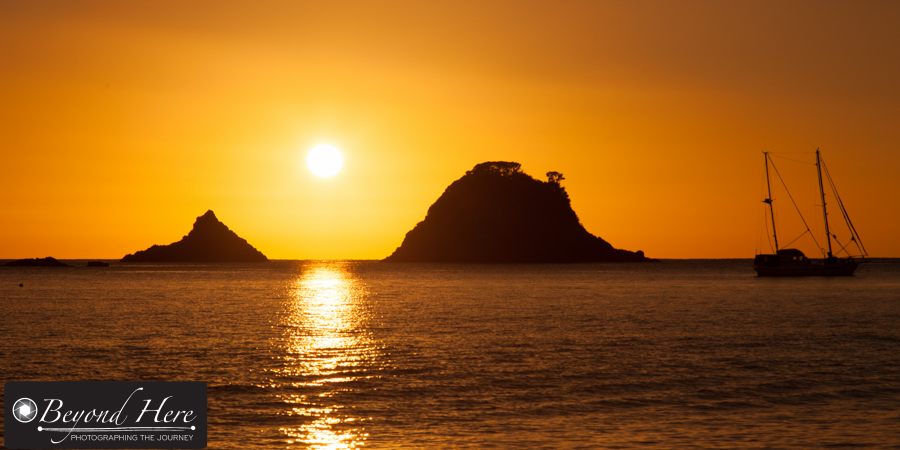
Here is the original image. This shot was taken at Hahei Beach on the Coromandel Peninsula in the north island of New Zealand. This is a fantastic place to visit. It faces east, so you see magnificent sun rises over the water. I had the good fortune to visit Hahei in March 2014 to shoot a wedding. This shot was taken on the morning of the wedding during an early morning walk on the beach.

Hahei Beach

Original image, Hahei Beach

The image has a nice sunrise, a reflection in the water, some islands, and a human presence through the yacht on the right of the image. (I was jealous when I thought about people on the yacht seeing this type of sunrise every morning!)

This image has several creative cropping options. Let’s look at two different horizontal options first.

Hahei Beach

Horizontal crop of Hahei Beach sunrise

Sunrise

Horizontal crop of Hahei Beach sunrise

The first creative cropping horizontal image retains the human element by including the yacht. The second version excludes the yacht and creates a stronger feeling of nature and isolation – with a bigger role played by the golden sky. Both of these images make use of the horizontal elements of interest in the image.

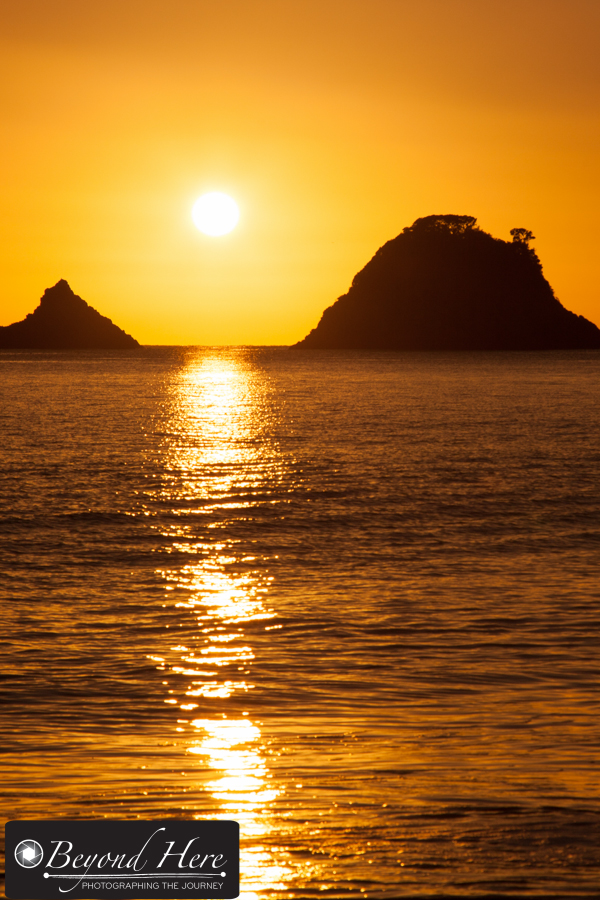
This type of image also has a vertical option for creative cropping. This style of creative cropping makes use of the vertical elements in the image – in this case the reflection of the sunlight on the water – which makes a pathway from the top to the bottom of the image.

Hahei Beach

Vertical crop, Hahei beach sunrise

My favorite images here are the second horizontal crop, and the vertical image. I like the simplicity the creative cropping has brought, and the strong role played by the golden colors. Which is your favorite?


Look for Baby Animals

Wildlife photography tip – if you want your friends to ooohhhh and aaaaahhh at your wildlife pictures, look for baby animals. It is the baby animals which get the “isn’t it cuuuuuute!” reaction.

Below are four examples of baby animals, the stories that go with them, and some technical data on each shot. These are all Australian wildlife.

Show me the samples!

Image #1 – Baby Koala

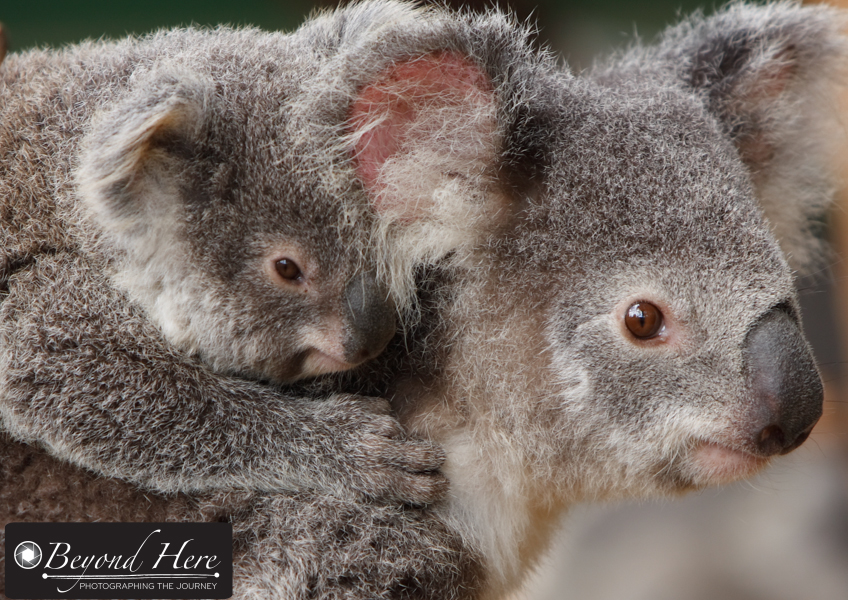
Koala and joey

Koala carrying its joey

Baby koalas are called joeys. They ride on mums back until they are too big. It makes for a great photograph when you can get the mother and baby both in the frame. This is relatively easy with koalas as the baby rides on mums back. Look for baby animals!

This image was taken in Queensland, Australia in the late afternoon. Koalas sleep for up to 20 hours per day. When they are awake, you can get a variety of shots in a short period of time. This shot was taken as it moved to another part of the tree to feed. The sun had set and so this was taken with quite slow shutter speed 1/60 sec at f4.

Image #2 – Baby Emus

Emu chicks

Emu chicks

Emu chicks can be challenging to photograph as mum won’t let you get close to them. She will stay near to them for protection.

They have the beautiful striped camouflage you can see in this image and are really cute.

To make this image I sat on the ground. This helped the adult emu know that I was no threat to her and her chicks. They proceeded to stroll all around me, and I was able to make a series of interesting images. Even though they are small, they rarely stay still. To get them nicely in focus you will need a higher shutter speed. This shot is 1/1250 sec at f4.5.

Image #3 – Bush Stone Curlew Chicks

Baby curlews

A bush stone curlew and its chicks

Bush stone curlews are common in the western suburbs in Brisbane, Australia which is where this image was made. They have an unusual behavior – when they feel threatened they stay completely still.

This does make them easy to photograph and you can get relatively close if you move slowly. Their chicks also have a similar striped pattern to the emus in the sample above. Very cute. Look for baby animals! This image was shot at 1/1250 sec at f3.5.

Image #4 – Kangaroo Joey

Kangaroos don’t generally let you get too close when they have young joeys who are out of the pouch. This one is big enough that it could easily have hopped away very quickly on its own. That might be the reason they both let me get relatively close – this shot was taken with a 70-200mm lens, 1/400 sec at f4.5

Kangaroo and Joey

Female red kangaroo and its joey

I love the look on the joey’s face as it peeks out from behind mum! If you want your friends to oohhh and ahhhh at your wildlife pictures – look for baby animals.

The koala and kangaroo images here are good examples of filling the frame with the subject for maximum impact. I wrote an earlier blog post on that topic to give your images greater impact.

What are your favorite baby animals to photograph?

How to Build a Home Photography Studio

In this post we cover how to build a home photography studio, based on my experience building one 18 months ago.

Step 1 – Space

How much space will you need? Most standard size backgrounds are 3m wide, so ideally you want a room that is wider than this. You will see in the photo, my room is about 3.2m wide at the ceiling and slightly wider at the floor (due to the odd shaped ceiling). How long the room is, is less critical. Any space more than 4m long will be plenty for most studio shots.

Step 2 – Backdrops

Your key decision with backgrounds is whether you want to use paper rolls which will need to be replaced over time, or an alternative. Paper rolls work really well where you do full length model images and have a hard floor.

My room is carpeted and I do very few full length shots. I chose to use muslin backdrops. These are readily available from studio photography stores or online.

Home photography studio

Home photography studio

Step 3 – Hanging the Backdrops

While you consider which type of backdrops to use, you also need to consider how you will hang them. A common choice is to buy a portable stand which they hang from. I didn’t go down this path as you need enough room to fit the legs of the stand in your room. That would have been wider than my room is.

I chose to put mounts in the ceiling and hang the backdrops on standard size curtain rods. The rods are 3.1m and the backdrops are 3m wide. The curtain rods are very affordable – A$9 each from my local hardware store.

The downside of this system is that the backdrops are not portable. (I have a separate “pop-up” backdrop which I use when I need a portable backdrop. I will save that for another post.)

The upside is that the mounts in the ceiling are very secure, and although you can’t see it clearly in the picture, it means I can hang 5 backdrops at once (one in front of the other).

Step 4 – Lighting

Step 4 is straightforward but potentially the biggest decision from a cost point of view. As you can see, I decided to get three lights, soft boxes, and stands. This gives me a variety of options for lighting a fairly small space. These are relatively inexpensive and low power. I was able to do this due to the small space, and to keep costs down.

I also use speed-lites with shoot through umbrellas when I need more lighting options.

Step 5 – Get to Work

It really is that simple to get started. Now that you know how to build a home photography studio, its time to get to work!

Do you already have a home photography studio? What were the key lessons from building it? If you haven’t built a home studio yet, do you have questions I can help with?

The “Go To” Lens

I have 4 lenses which I use for the bulk of my photography work – but one of them is the “go to” lens. It goes to nearly every assignment.

I use Canon L series lenses. They are Canon’s highest quality lenses and are recognizable by the red ring around the end of them.

The 4 lenses I mainly use are:

  • 50mm f1.2 This lens is always in my bag for weddings. It performs very well in low light situations like churches and reception venues.
  • 100mm macro f2.8 This is a versatile lens. I use it for macro images, some portraits, and quite extensively in my stock photography work. It is not just for macro images.
  • 24-105mm f4 This is a very useful and versatile lens. I use it for portraits, landscapes, and for stock photography.
  • 70-200mm f2.8 This lens gives great flexibility. I use it across a broad range of image types – from studio portraits to weddings to wildlife.

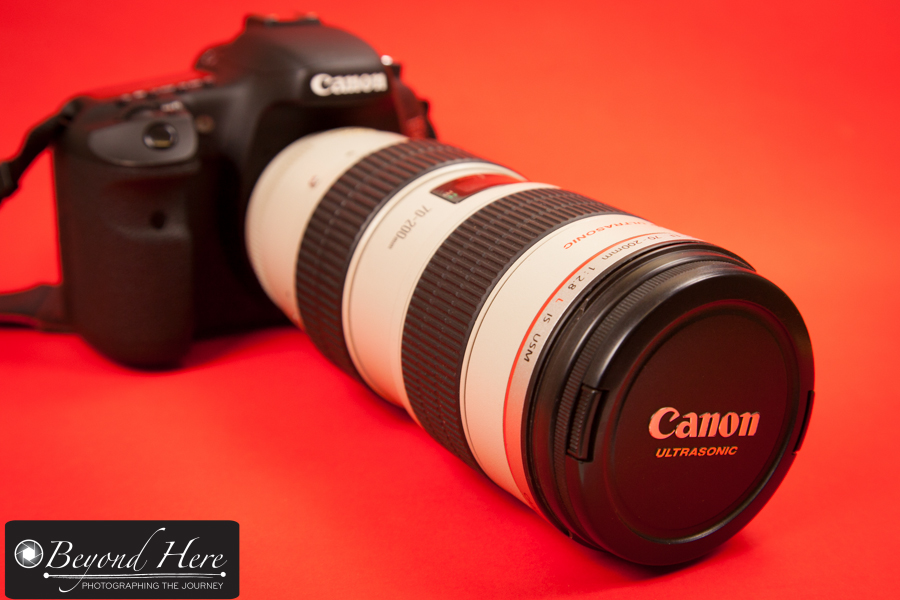
All 4 are very good lenses and provide options for making different types of images. That said, the 70-200mm lens is the “go to” lens. It is in my bag for nearly every photography job – weddings, studio portraits, outdoor portraits, and wildlife shoots. The zoom range gives flexibility, and being able to shoot at f2.8 lets me achieve fast shutter speeds with a narrow depth of field.

Canon lens

The Canon 70-200mm f2.8 lens

It is a great lens and I recommend it if you are serious about your photography. If you don’t use Canon equipment, don’t worry. All the major lens manufacturers have an equivalent lens. I’d recommend you check it out.

What are the trade-offs?

There are two trade-offs with the 70-200mm lens.

First, it is relatively expensive. The Mark II version with image stabilization is around A$2800. If that is out of the budget, consider a second hand Mark I version or a cheaper model with the same zoom range. A cheaper lens won’t have the same image quality but that may not be critical for you.

Second, it is quite heavy, at just under 1.5kg. Carrying this lens all day can be challenging.

When don’t I carry the 70-200mm?

I don’t carry the “go to” lens when I shoot corporate portraits at an office. These are typically small spaces not suited to this zoom range. In this case I use the 24-105mm lens.

What is your “go to” lens? Is there one lens that always goes in your camera bag? Why?

Three Tips for Getting Started in Small Business

Planning

Having a clear plan and commitment is key

Since 2008 I have been running a photography business as well as working a full time corporate role. This post covers three tips for getting started in small business.

There are a myriad of issues to consider when you are getting started in small business. Here are three tips which have been useful for me.

Tip #1 – Decide the operating and income model

This step is all about defining what you are going to do and how you are going to generate income. You need to be clear on exactly how the business will operate and where the revenue will come from.

For me, back in 2008 I decided that I would start my photography business by focusing on stock photography. I could shoot images on weekends, and edit and upload during the week around my other commitments.

Being clear on this step is very important. How will you generate income?

Tip #2 – Give it Time

A lot of new businesses are born with what we perceive to be a great idea and start with an explosion of energy. Unfortunately, it often doesn’t take long until the reality doesn’t match the dream.

I recommend taking time when you have the brilliant idea. Rather than beginning with enormous energy, take time to think through the plan. Reflect for a moment – even at this early stage. After some thought, if it still looks as good a week later and you feel passionate about the business, then it is time to start.

Tip #3 – Plan Your Time

This was the key for me! I set aside 2 hours each week night to work on my photography business. I stuck to the same 2 hour period for the first 2 years.

It is remarkable how much you can achieve in 10 hours per week when you are focused and it is part of your daily routine. That time was spent researching and planning stock photography concepts, editing, uploading and keywording images. The photo shoots happened on the weekends.

The habit of setting aside time and working the plan was key! Without a plan and commitment your business may fall over.

Are you running a small business? What have been the keys to your success? What lessons have you learned that others may learn from?


This Is Why

Why do I shoot family portraits? It’s not for the money, or to win awards, or for fun. It’s because it matters. It’s important. This is why I shoot family portraits.

Below is the story of my most important portraits ever. I will take technically better images, but I will never take a more important series.

I had the good fortune to take portraits of this lady over a period of 18 months. They were impromptu sessions, and I took just a few images each time. They were not in ideal lighting conditions or with any particular preparation. There was no hair and make up done in advance. I had the camera, and she was ok with having her picture taken – briefly.

At the time of this image she was in her mid 70’s and undergoing treatment for cancer. That included several rounds of chemotherapy and radiotherapy.

Cancer Patient

Cancer patient. My most important portrait series ever.

She lost her hair early in the chemotherapy treatment. The hair you see is a wig. After she lost her natural hair I didn’t ever see her without a wig or a hat to cover her head.

Sadly she has passed away, after an extended battle with cancer.

This image was used on the card sent to friends and family inviting them to come together to celebrate her life. Another of my images was used on the cover of the order of service. Another, with her husband of 48 years, was on the back cover. The same image was used on thank you cards sent to friends after the funeral.

The family have great memories of this lady – and a small series of portraits to pass down the generations. It matters. It’s important. This is why I shoot family portraits.

The lady in the picture passed away on 6 June 2014, two days short of her seventy sixth birthday.

She is my mum.

It matters. It’s important. This is why.


Photography Tips Showing Part of the Scene

Here is the latest of my photography tips – showing part of the scene. Sometimes it is more effective to show only part of the scene to communicate emotion in an image.

This week I have been in Sydney. If you have never been to Sydney, it is worth the trip just to spend a few hours walking around Sydney Harbor. In less than one hour you can visit Darling Harbor, The Rocks, Sydney Harbor Bridge, Circular Quay, Sydney Opera House, and the Botanic Gardens. While you can do that in less than an hour – I recommend taking the camera and spending much longer.

Sydney Opera House

Part of the Sydney Opera House which accentuates the size of the sails

Visiting Sydney reminded me of two of my favorite images – both taken several years ago, and both of which provide a compelling image by showing part of the scene.

The image above was shot at dawn. I was standing opposite the Opera House using a 70-200mm lens. It was a grey cloudy morning, until the sky lit up in golden, yellow colors. The sun broke through the cloud for no more than 3 or 4 minutes. During that time, I was fortunate that a jogger ran up the steps and into this scene – highlighting just how big the sails are.

The second image (below) was shot at sunset. It is a closeup of people doing the Harbor Bridge climb. It was taken from in front of the Opera House looking across to the Harbor Bridge with a 70-200mm lens. Again, shooting only part of this scene gives a stark contrast between the huge metal bridge structure and the tiny human figures. The nice sunset helps as well!

Sydney Harbor Bridge

Tiny human figures doing the Sydney Harbor Bridge climb

Both of these images are good examples of showing only part of the scene to communicate a message. The contrast between the small human figures and the large architectural structures is really striking.

These images were both shot in the Sydney Harbor area. Do you have a favorite photo spot in Sydney?


My Take On Microstock Photography

The microstock photography industry is going through a period of change. This post is my take on microstock – and whether it is still possible to make a financial return through microstock.

I have been actively contributing to microstock photography sites since 2008. This was firstly through sites including Shutterstock and Dreamstime, and since 2010 as an exclusive contributor to istock (owned by Getty Images)

In 2008 the istock discussion forums were very active. Contributors were reporting strong growth in download numbers. It seemed that every day there were people posting they had “ditched the day job and were now full time istockers!”

Those times have changed. Today the istock forums are not as active, and there is almost no-one reporting increases in download numbers.

Tough Times

Challenging times for microstock contributors

So what’s changed?

  • istock and other microstock sites have increased prices. It is no longer “cheap” to buy good quality stock images.
  • there are more competitors. The number of stock photography sites has increased and continues to increase.
  • there are a lot more contributors
  • there are even more images

My average royalties per download have increased fourfold over the last 3 years. On the surface, that sounds great. But the trade-off has been a reduction in the number of downloads. Overall my total monthly royalties have remained steady, despite an increase in portfolio size.

The total market has seen a very significant increase in the supply of stock images, without the same growth in demand.

What does the future hold?

If you are a customer looking for stock images, the growing supply of images is going to give you a huge range of images to choose from. Given the very competitive nature of the market, you should be able to get these at fair prices.

For contributors, I see it being very difficult to make a full time income from microstock photography in the future. That said, microstock continues to generate a significant supplementary income for me and many others. I expect to be able to continue to build my portfolio and maintain the current level of income. It is a very worthwhile part of my photography income and I encourage others to commit to microstock.

Are you a contributor to microstock? What is your experience? What are your expectations?


How to Create Images with a Clean White Background

Human hand on white background

Number 1. Human hand on white background

This post looks at how to create images with a clean white background. This style of photography is ideal for:

  • adding images to a white page or website
  • photographing products to sell online
  • creating a clean, fresh look for your images
  • building a stock photography portfolio

So, what do we need?

1. We need a white or white-ish background. This can be a white wall, or sheet, or studio background. It can be anything as long as it is white or nearly white.

2. We need two light sources – one to light the subject and the other to light the background. This can be as simple as a window to let natural light fall on the subject and a flash or bright lamp to light the background.

3. A subject! Of course. And a camera! (And maybe some patience if you are doing this for the first time.)

Volunteer concept on white background

Volunteer concept. White background.

How do we create these images?

1. The images here are shot in my studio using a white, muslin backdrop. They have a set of studio lights to light the subject, and a flash to light the backdrop. I use a radio trigger to fire the flash. If you don’t have that equipment, don’t worry. Just make sure you have two light sources.

2. There needs to be distance between the subject and the background. In these images the subject is approximately 3 meters in front of the background. The flash is placed between the subject and the background, aimed at the background.

3. The light on the background needs to be brighter than the light on the subject. This is why a flash works well. It produces a very bright flash of light which makes your white background appear pure white. You can measure the light using a light meter if you have one. If not, use trial and error. If you are using a flash you will rarely need it on full power. I generally use one-half or one-quarter power on the flash.

Money laundering

Concept for money laundering on white background

If you are feeling overwhelmed by different light sources and power settings – don’t be! I have a friend who shoots this style of image using natural light, a single lamp, and a white wall in his house. He produces very clean images like the ones here – without any fancy equipment!

Once you have understood how to light the subject and the background independently it is very easy to create images with a clean white background. They are very useful for both web and print application and are used extensively by graphic designers. Subjects isolated on white backgrounds have been core material for stock photographers.

You can produce images like this too!