Tag Archives: wildlife photography tips

5 Tips for More Compelling Wildlife Images

Wildlife  photography is a hugely popular field for both amateur and professional photographers. Here are 5 tips for more compelling wildlife images.

Pademelon

Look for pairs of animals to add a new dimension to your images.

Tip 1 – Look for Pairs of Animals. Solo portraits of animals can make compelling images, but pairs of animals add a new dimension. There is the relationship between the animals and the interaction between them. Look out for pairs of animals.


Koala

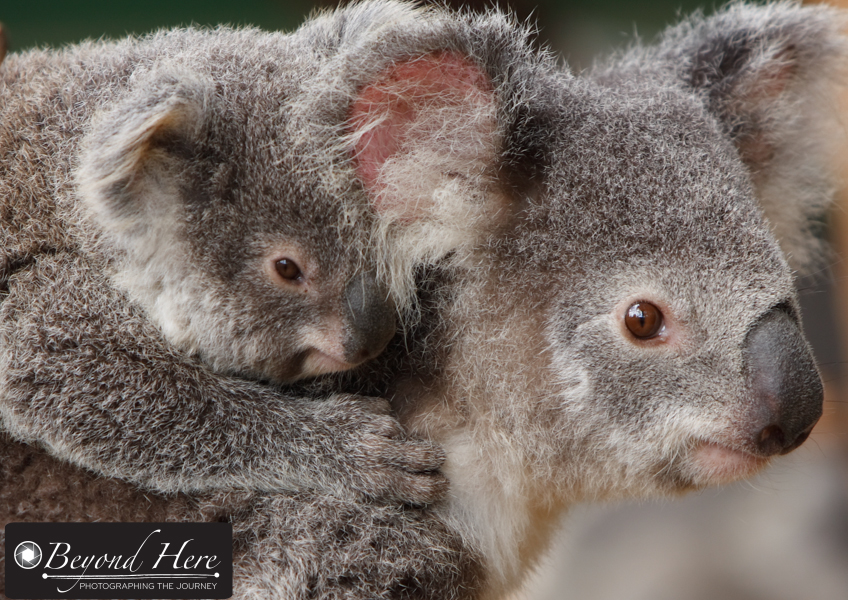
Baby animals are great subjects for wildlife photography

Tip 2 – Photograph baby animals. If you want people viewing your images to “ooohh and aaahh” then build a gallery of images of baby animals. There is something about the cute, vulnerability of baby animals – as well as the connection with the parent that is guaranteed to create compelling images. Koalas, like in this image, spend the first few weeks of their life in their mothers pouch. When they become too big, they are transported on their mothers’ back. This period is an ideal time to shoot images which include both mother and baby. Inevitably the baby will be looking small and cute, and mum will be alert in protecting her young one.

Flying fox

Animals in action. A flying fox carrying its baby.

Tip 3 – Look for animals in action. Animals in action, engaging in natural behavior are always more interesting than animals doing nothing. This is particularly why you get very different types of images when you photograph animals in the wild compared to animals in captive environments such as zoos.

In this image, the grey headed flying fox is flying through the air. If you look very closely you can see that it is carrying its baby at the same time. The baby is clinging to its mothers’ chest and will continue to do this until it is large enough and strong enough to fly alone. This image also emphasizes one of the key features of this animal – the spooky vein structure which is visible in the wings. When you are planning your wildlife shoot, consider what feature of the animal you are photographing you want to highlight.

Duck

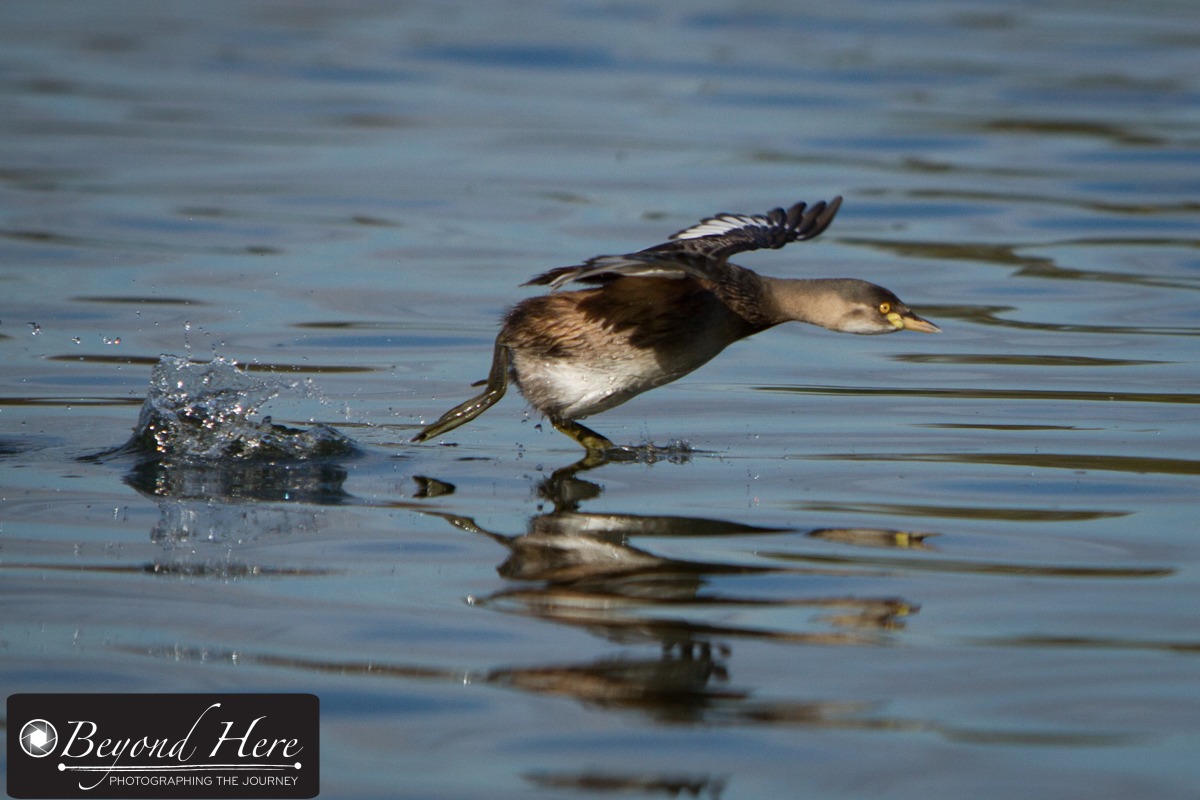
A very low angle makes a compelling image of a common animal

Tip 4 – Shoot from unusual angles. Ducks are very common birds where I live in Melbourne, Australia. In creating compelling images of common animals, look for different angles to shoot from. In this case I lay down at the edge of the lake, to shoot an image from the duck’s eye level. For more about this shoot, please see this post.

Tree kangaroo

The Goodfellows Tree Kangaroo is an endangered species from New Guinea

Tip 5 – Photograph unusual wildlife. Unusual wildlife make compelling images. This image is a Goodfellows Tree Kangaroo. They are native to New Guinea and are now an endangered species. Images like these are compelling, not only for the beautiful colors of the animal, but also because most people will never have seen this animal. Look for unusual wildlife for more compelling images.

Thanks for reading 5 tips for more compelling wildlife images. Good luck with your wildlife photography.

5 Tips for Making Images of Fast Moving Animals

This morning I visited one of my favorite wildlife photography spots – Yarra Bend Park in suburban Melbourne, Australia. It is about 20 minutes from where I live and has a colony of thousands of flying foxes. If you’d like more details about where to find Yarra Bend Park, please see this post.

I was there for about 1 hour and made a wide range of flying fox images. Here are 5 tips for making images of fast moving animals.

Flying Fox

Fast shutter speeds are required for fast moving animals

Tip 1 – Continuous Focusing Mode

When an animal is moving quickly, getting it in focus is key to a successful image. Use continuous focusing mode on your camera to track the animal as it moves, and to give you the best chance at an image in focus.

Flying Fox

Increase ISO to help with fast shutter speeds. This shot was taken at ISO400.

Tip 2 – Increase the ISO

To allow a fast shutter speed you may need to increase the ISO setting on your camera. In the images posted here the ISO ranged from 400 (for the images shot against the cloudy sky) through to 1250 where I was shooting against a dark green background.

Tip 3 – Fast Shutter Speeds

The combination of continuous focusing mode, ISO, and fast shutter speed will give the best chance for sharply focused images. In the flying images here I have used 1/2000s for the majority of these images.

Tip 4 – Expect Lots of Failures

When animals are moving quickly you will have a large number which are out of focus or not well composed. Don’t be upset, this is normal in wildlife photography. You will find that your percentage of good images increases with practice.

Flying fox

Be alert for the opportunity to shoot strong images when the animal stops

Tip 5 – Look for Strong Images When the Animal Stops

It can be tempting to only shoot the animal as it is moving. Resist this urge, and create some very different images when the animal stops. The flying foxes roost in the trees given an excellent opportunity for images as they hang upside down.

Thanks very much for reading 5 Tips for Making Images of Fast Moving Animals.

Flying fox

Practice will increase your percentage of successful images.

Shooting at Eye Level

Want to add more interest to your wildlife, nature, or children’s shots? Shooting at eye level will do it. The alternative is to shoot down on to your subject. While that downward view is the one we see most often with our eye, shooting at your subjects eye level is almost always the more interesting shot. This technique works particularly well with wildlife, children, and flowers. It can take time and effort to get down to your subjects level but it will be worth it for the unique angles and improved shots.

Here are 3 examples.

Duck on lake

Shooting at eye level here meant lying on the ground

In this image of a duck paddling across a lake it was tricky to get down to the duck’s eye level. To make this shot I lay face down on the ground to get a “duck’s eye” view. People walking past would have thought I looked a little strange (!) but I achieved a series of interesting wildlife images – all taken from a duck’s eye point of view. It was a calm day and the reflection was a bonus.

In example two, a child on his father’s shoulder, it was much easier to shoot at eye level. For this shot, the father was holding the son on his shoulder trying to calm him down. Rather than being ‘down time’ in our family portrait session, it was a great opportunity to shoot an eye level portrait of the child. And briefly he stared directly at me. Nice one.

Child

Shooting at eye level will add interest to children’s portraits

Example 3 are tulips. Rather than shooting down from above flowers, try getting down very low and using the sky as your background. It eliminates a muddy, dirty background and replaces it with a blue plain background which highlights the color of the flowers. It isn’t strictly ‘shooting at eye level’ but it is a very different angle than shooting down from above. It can be challenging to shoot flowers differently – but getting down very low is a great place to start.

Tulips

Shooting flowers from a very low angle can create unique images

Shooting at eye level often produces outstanding images. Keep this in mind next time you are shooting wildlife, children or flowers.


Making This Waterbird Image

Wildlife photography continues to grow in popularity as prices of high quality digital cameras and zoom lenses continue to fall. Enthusiast photographers are picking up the challenge and creating great wildlife images. Here are some tips from one of my heron images. Read on for details on making this waterbird image.

Heron

A combination of high overhead cloud, a clean background and a great reflection make this image work

This image was taken at Albert Park Lake, just a few kilometers from downtown Melbourne, Australia. (If you are a motor racing fan, this is the lake that the Australian Grand Prix Formula One race goes around).

This shot was taken in the early morning, with high overhead cloud and no wind. In fact, it was a surprisingly still morning.

What makes the image work:

(1) Lighting. The high cloud results in very even lighting on the bird. There are no harsh shadows from sunlight. Melbourne in the winter gets a lot of cloudy weather which is ideal for evenly lighting outdoor subjects.

(2) Background. I had to walk to get to a position where there were not reeds or other distractions in both the foreground and background. Having a clean background increases the focus on the subject, and that has worked very effectively here.

(3) Reflections. Still days can create great reflections in water. You can get them in lakes, but also smaller areas of water. Even puddles can provide great reflections. I composed this image to include the reflection as a key component of the image.

(4) Focus. This image was shot at f2.8 using a single focus point aimed at the birds eye. This has provided very sharp focus on the bird. If you are looking to increase the quality of your wildlife images, try using a single focus point and aiming that focus point at the subjects eye (use this tip for portraits of people as well)

(5) Distance. Being some way back from the heron means it was going about its normal business without really being aware of the photographer and the camera. This image was shot with a 70-200mm lens at 200mm on a crop sensor camera (effectively given the equivalent of a 320mm zoom).

(6) Crop. I have cropped this image to square format to fit with the shape of the heron. It worked more effectively in this format than as a horizontal dimension image.

I hope these tips have been useful in understanding making this waterbird image. Best wishes with your wildlife photography.


Add Interest to Your Wildlife Images

I am a big fan of wildlife photography. The world around us is amazing and so are the animals in it. Here are 8 quick tips to add interest to your wildlife images.

Corella

Multiple animals in one image adds interest

Multiple Animals. A single animal on its own can create a great image, but multiple animals in the frame adds real interest. The image becomes about that type of animal, but also about the interaction between them. These corellas look like they are working as part of a team to keep an eye out for potential danger.

It is harder to shoot multiple animals in one frame – but look out for these opportunities. They are a good first step for how to add interest to your wildlife images.

Joey

Look out for baby animals to add impact to your images

Baby Animals. If you want to get a strong reaction to your wildlife images, look out for baby animals! There is almost a guaranteed ‘wow’ if you can shoot images with baby animals in them.

In this image of a red kangaroo and her joey, it appears that the joey is peering out from the protection of its mother to see what the photographer is doing.

The size difference between the two animals, and the cute ears, mean added interest to a single animal or two adult animals. Baby animals are a very easy way to add interest to your wildlife images. I wrote a previous post about this, which you can see here.

Clean BackgroundsLike with any sort of portrait a clean, clear background will help your subject to stand out in the image. And this will help focus the viewers attention on the subject.


Black swan

A clear background of the lake helps focus attention on the black swan

This image of a black swan was taken in Perth, Western Australia. Fortunately when swans flap their wings like this, they tend to do it several times. This enabled me to get in a position with a clear, water background. It has no distracting lakes edge, or reeds, or people walking past the lake.

When you are next out shooting, see if you can add interest to your wildlife images by removing any distractions in the background. Clean backgrounds help to produce compelling wildlife portraits. 

Tasmanian Devil

Interaction creates interest

Interaction. One of the benefits of having multiple animals in your image is that you will often see them interacting. Not only can you get a great image of the animals itself, your image can provide insight to the connection between animals. Wait for the moment when the two animals connect.

Cockatiel

Shoot close up with a long lens

Close Ups. Getting really close up can add a lot of interest to your wildlife images. Through your camera and your image, you can provide a view that is not possible to the human eye. This cockatiel pair would not let me get this close if I was standing near them, but with a zoom lens we can see them in close up.

Duck

Blue billed duck reflected in the lake

Reflections. Reflections can add a lot of interest to your wildlife images. I wrote an earlier post about this which you can find here.

This is a blue billed duck. See the interesting reflection in the lake. Good reflections need still water. Often the best time for this is in the early morning.

If you are an early riser, take advantage of the reflections at this time of day.

Grebe

Look for animals in action

Action. Animals in action adds a lot of interest to wildlife images. This bird is a grebe and this shot was taken at a lake in Perth, Western Australia. It is common for these birds to run across the top of the water. Be patient and use a fast enough shutter speed to freeze the action. 

Parrot

Look for color to create interest

Color. Animals come in a very wide range of colors. Bright colors attract our attention in any image. Look for bright colors to add interest to your wildlife images.

That’s it for 8 quick tips for how to add interest to your wildlife images. Happy photographing!

Better Backgrounds for Better Images

Better backgrounds

A clean background has added impact to the subject

This photo was selected as the file of the day on one of the wildlife photography communities I participate in on Google+. It is a female superb fairy wren. I took this shot yesterday afternoon in Melbourne, Australia. It has prompted me to write about what is the single biggest way to improve your photography – better backgrounds for better images.

This tip is applicable to nearly every type of photography – and on this post I have included sample images from weddings, wildlife, sports, and family portraits.

In all these types of photography, having a nice clean background has focused attention on the subject. There is nothing distracting or off putting, and the subject really stands out in the frame. So, let’s see some sample images, and discuss how to use better backgrounds for better images.

Better backgrounds

A clean, bright background focuses attention on the subject

This example is from a family portrait shoot. In any type of photography where you are setting up the shot, getting nice clean backgrounds is straight forward but requires the photographer to choose the type of background suitable to the shot. In this case, I was doing an outdoor family portrait session at a park. The child was wearing dark colors so I looked for a plain background which also had lighter colors. In this case, the background is a stone wall which formed part of a monument. It is a nice bright color which offsets the subject’s dark shirt, and provides a clean but textured background. At a park environment, also look for trees or nature scenes which would give clean backgrounds, or fences or building walls. These can all be effective.

Better backgrounds

An outdoor stairwell as a background for a wedding image

Ok, now for a wedding image. This image was taken at an inner city wedding. As you can see I have used an outdoor stair well as the background for this image. Weddings are particularly important to get clean backgrounds, as the focus needs to be on the couple, their relationship and the wedding day.

Again, with weddings you have time to plan these images in advance, and as long as the weather cooperates, it is a matter of following your plan. In this image the lack of color in the stairs also helps to focus attention on the bride and groom. (Interestingly, this image had more impact because of the colors than a similar black and white image.)

Even in inner city, busy environments with lots of people, it is possible to find clean backgrounds to support your images. Look for stairwells, doorways, arches, or architectural features – like walls. Better backgrounds for better images works for wedding photography too.

Freezing motion

Freezing motion in indoor lighting conditions will require higher ISO

The use of plain backgrounds in sports can be effective, but there are also times when a busy background works well in sports photography.

If you think about a basketball image, there is a time to have the player on there own, and also a time for the player to be seen against a background of a cheering crowd.

In sports photography, it is still possible to get clean backgrounds, but it also might be more effective to get a busy background of a cheering group of supporters.

Ok, so how do we put the lesson of better backgrounds for better images into action? To improve your photography with this technique it is a matter of consciously choosing what you would like for your background and then practicing. After a short period of time you will be subconsciously positioning yourself and your subject to achieve backgrounds which help your subjects stand out.

If you have found this post – better backgrounds for better images – useful, you may also like posts on:

Thanks for reading this post. Good luck with better backgrounds for better images.


Capture the Icons

This week I have been in Tasmania, Australia (without the camera). Being there made me think about how important it is to me to photograph the icons in each place I spend a significant amount of time. In addition to my wedding photography, I’m a keen wildlife photographer, so that means I try to capture the icons of the local wildlife.

Tasmanian Devil

Close up of a Tasmanian Devil

If you are not familiar with Tasmania, it is an island state of Australia located south of the mainland. It is important to me to clarify that, because I recently posted a picture of a Tasmanian Devil on Google+ and indicated the picture was taken in Australia.

Tasmanian Devil

The Tasmanian Devil is a carnivore

I got one comment which said it couldn’t possibly have been taken in Australia, as they are only found in Tasmania. While I found this mildly amusing, he refused to believe that the image had been taken in Australia, or that Tasmania was part of Australia! I should have suggested he come and visit some time.

Tasmania is known for a number of things including – spectacular scenery, friendly people, fresh air, great sunrises and sunsets, fantastic farming conditions and primary produce, excellent fishing, windy weather, and for the animal which bears its name – the Tasmanian Devil.

Tasmanian Devils are not easy to photograph as they are hard to find and don’t often keep still. I have been slowly building my range of Tasmanian Devil images over the last 5 years. Some quick facts about Tasmanian Devils. They are:

  • characterized by a stocky, muscular build
  • the size of a small dog
  • known for the power of their jaws relative to their total size
  • known for their ferocity when feeding
  • exist in the wild only in Tasmania (that’s Tasmania, Australia!!)
  • since 2008 have been listed as endangered, mainly due to the impact of facial tumor disease on the population
Tasmanian Devil

Tasmanian Devils are known for the power of their jaws

One fact I didn’t know until today, is that very few Tasmanian Devils exist outside Australia because the population which has been exported have not been successful in breeding. Interesting. Perhaps that’s why pictures of them seem to get an extraordinary number of comments on social media? Or maybe people feel a connection to them through the Looney Tunes character “Taz”?

Visiting Tasmania is always enjoyable, even if it is a little cold at this time of year. It was also a timely reminder to me to take time to capture the icons photographically.

Do you have a favorite icon to photograph? Buildings, architecture, people, wildlife? Have you had the chance to photograph a Tassie Devil??


Look for Baby Animals

Wildlife photography tip – if you want your friends to ooohhhh and aaaaahhh at your wildlife pictures, look for baby animals. It is the baby animals which get the “isn’t it cuuuuuute!” reaction.

Below are four examples of baby animals, the stories that go with them, and some technical data on each shot. These are all Australian wildlife.

Show me the samples!

Image #1 – Baby Koala

Koala and joey

Koala carrying its joey

Baby koalas are called joeys. They ride on mums back until they are too big. It makes for a great photograph when you can get the mother and baby both in the frame. This is relatively easy with koalas as the baby rides on mums back. Look for baby animals!

This image was taken in Queensland, Australia in the late afternoon. Koalas sleep for up to 20 hours per day. When they are awake, you can get a variety of shots in a short period of time. This shot was taken as it moved to another part of the tree to feed. The sun had set and so this was taken with quite slow shutter speed 1/60 sec at f4.

Image #2 – Baby Emus

Emu chicks

Emu chicks

Emu chicks can be challenging to photograph as mum won’t let you get close to them. She will stay near to them for protection.

They have the beautiful striped camouflage you can see in this image and are really cute.

To make this image I sat on the ground. This helped the adult emu know that I was no threat to her and her chicks. They proceeded to stroll all around me, and I was able to make a series of interesting images. Even though they are small, they rarely stay still. To get them nicely in focus you will need a higher shutter speed. This shot is 1/1250 sec at f4.5.

Image #3 – Bush Stone Curlew Chicks

Baby curlews

A bush stone curlew and its chicks

Bush stone curlews are common in the western suburbs in Brisbane, Australia which is where this image was made. They have an unusual behavior – when they feel threatened they stay completely still.

This does make them easy to photograph and you can get relatively close if you move slowly. Their chicks also have a similar striped pattern to the emus in the sample above. Very cute. Look for baby animals! This image was shot at 1/1250 sec at f3.5.

Image #4 – Kangaroo Joey

Kangaroos don’t generally let you get too close when they have young joeys who are out of the pouch. This one is big enough that it could easily have hopped away very quickly on its own. That might be the reason they both let me get relatively close – this shot was taken with a 70-200mm lens, 1/400 sec at f4.5

Kangaroo and Joey

Female red kangaroo and its joey

I love the look on the joey’s face as it peeks out from behind mum! If you want your friends to oohhh and ahhhh at your wildlife pictures – look for baby animals.

The koala and kangaroo images here are good examples of filling the frame with the subject for maximum impact. I wrote an earlier blog post on that topic to give your images greater impact.

What are your favorite baby animals to photograph?