Category Archives: Gear Guide

Reviews of photography equipment

Shoot to Two Cards

On a recent shoot, a client shared that her friend had lost all her wedding photos as the photographer had a problem with the memory card. A nightmare scenario for both the bride and the photographer! What a nice reminder to shoot to two cards.

Most readers of Beyond Here are professional or semi professional photographers. I hope that for many this is a piece of advice that you don’t need as you routinely shoot to two cards.


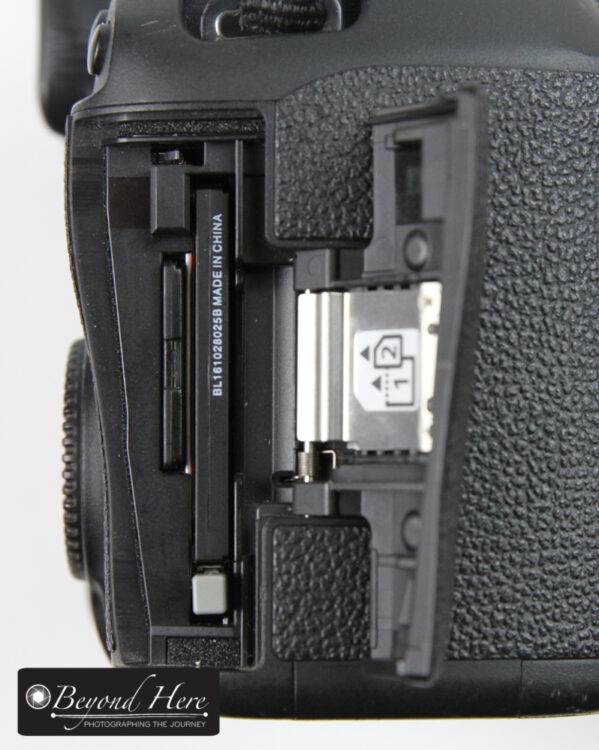
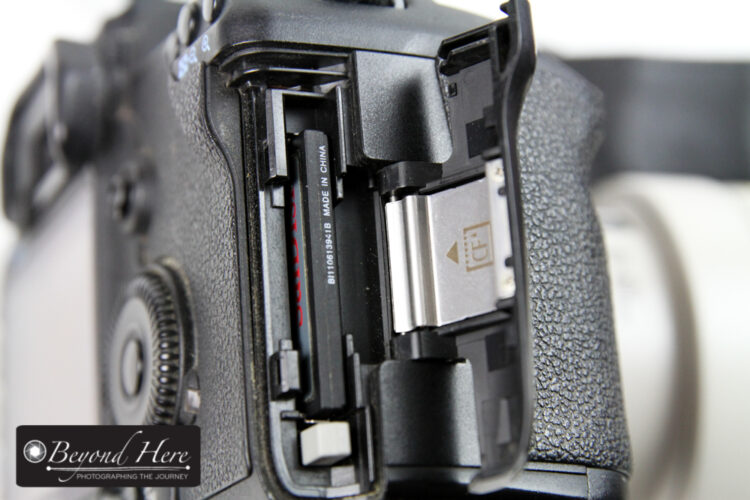
Canon camera with card slots for CF and SD cards

Older Digital Cameras Only Have One Card Slot

In early generations of digital cameras, the camera typically only has one card slot. In many ways, this made things easier as I didn’t have to think about whether I wanted to shoot to two cards. My second shooter at weddings was also my backup should anything go wrong with any of my cards.

Newer Digital Cameras Come with Multiple Card Slots

Digital cameras evolution has led to cameras with multiple card slots. Pause for a moment to think why would this be? It is to overcome the odd occasion when something goes wrong with a card. How handy to have the images recorded to another card.

An older Canon digital camera with single CF card slot

Get into the Habit – Shoot to Two Cards

I know several photographers whose standard procedure is to shoot only to one card. It saves them money on buying cards, and time in managing files. I hope they don’t learnt the hard way that shooting to two cards is a lot wiser and is worth a little extra cost of buying some more cards.

Purchase some extra cards, and make shooting to multiple cards the default setting for your camera. It will be great peace of mind should anything go wrong with one of your cards.

A New Way to Boost Productivity

Many of us are running micro and small businesses. There is a constant challenge in this type of operation to be making the most of the available hours. Some people are excellent at this and always seem to have spare time, while others seem to work endlessly without ever really getting ahead. I pride myself on running a healthy business which leaves me time to do other things in life. In the last month though, I’ve found a new way to boost productivity. It’s not one I’m particularly proud of (!) but there is a lesson in here.

I like the wisdom and irony in the saying ‘the bleeding edge of technology’. It’s similar to the leading edge of technology except it’s one that comes at a cost. It can be painful. I have several friends in this space. They feel compelled to have the latest photographic equipment and will buy new equipment whether they need it or not. They’ll also buy it regardless of whether they have existing equipment which can do the job. I prefer not to be at that expensive, bleeding edge. I typically don’t buy the latest model camera body as soon as it comes out. I will wait until it has been in the market for some time, and has been proven to be effective. I’ll typically buy when the price comes down, perhaps 12 or 18 months after the model first came out. Where’s this heading and where is a new way to boost productivity?

Couple

Greater productivity in my post production work leaves more time for shooting.

While I’ve been good at steadily updated my photographic equipment, the same can’t be said for my computing power. I’ve been using an old laptop, which I have stuck with for too long. It runs slowly. It takes too long to start up. It’s weighed down by the thousands of images I’ve shot and downloaded onto it.

So, I’ve recently got a new computer and am in the process of using it more and more, and using the old one less and less. So where is a new way to boost productivity? You won’t be surprised to hear that the new machine runs much more quickly than the old one. I estimate my productivity for post production work (and even writing blog posts!) is up approximately 25%.

business

Is Christmas the time for you to upgrade your businesses computing power?

While it’s an embarrassing story to tell, I really believe my ‘computer time’ efficiency has improved 25%. That leaves me more time to speak with clients, or do more shoots, or just enjoy the Melbourne summer.

I definitely should have upgraded my computing power at least 2 years ago. In future, I will be thinking of this as an investment in an asset for my business. I might not be at the bleeding edge of technology, but I’ll make sure my computer is adding to my business and not slowing it down. How good are you at upgrading your computer assets? Are they adding or detracting from your business?

Thanks for reading a new way to boost productivity. I hope it’s given you reason to consider your own business needs.

Pretty Cool Personalized Camera Strap

This week I celebrated passing a milestone in my stock photography work. I started contributing to iStock in 2008. At that time there was a limit of 15 uploads per week. A lot has changed in stock photography and for iStock itself since then, and this week I had my 10,000th photo added to the collection. So what has that got to do with a pretty cool personalized camera strap? I’ll get to that!

For the last 10 years I’ve been able to average 1000 uploads per year to my stock portfolio in addition to other work. This year I’ve really knuckled down, and have gone from 9,000 to 10,000 photos on iStock in just 5 months.

How have I done that? These 2 posts from Beyond Here helped me make a step change in my stock photography output. Check out How to Drive Change in Your Photography Business and Two Great Sayings Photography Business Owners Should Know.

camera strap

The personalized camera strap arrived in a funky branded box

So where does a pretty cool personalized camera strap come in?

To celebrate the milestone of reaching 10,000 stock images I splashed out on a personalized camera strap from Luckystraps.

I’ve always disliked the branded camera strap which comes with Canon camera bodies. I particularly dislike that the strap has the name of the model on the strap. For potential thieves it makes it very easy to know which camera to try to steal. As a user of full frame camera bodies I’d prefer those potential thieves don’t know the model and value of my camera.

camera strap

Luckystraps are based in Australia but ship worldwide

So this week, I checked out the leather camera straps from Luckystraps. They have an interesting range, and I particularly like the classic look of their leather camera strap. They offer a service to emboss the strap and so I had my name added. It’s a pretty cool personalized camera strap.

Even more impressive was that I ordered the strap on the Tuesday, and it was delivered on Thursday. Nice work.

If you are interested in a personalized camera strap – check out Luckystraps.

Note: It turns out that Luckystraps is run by a guy called Justin in Bendigo, Australia. Bendigo is one of my favorite places in regional Victoria, so I have an instant liking for Justin and his business! As I read more on his website, Justin runs a wedding photography business. Not only is he living in a pretty cool place, he’s involved in a pretty cool business. Good job Justin. Check out the Luckystraps website and get yourself a pretty cool personalized camera strap. (I have no affiliation with Justin or Luckystraps – although I’d like to! It would give me another reason to visit Bendigo!)


8 Reasons Renting Pro Photo Gear Makes Sense

More and more professional and semi professional photographers are choosing to rent gear rather than buy it. Have you started to rent equipment too? Here are 8 reasons renting pro photo gear makes sense.

Reason #1 – Renting is very cost effective if you are not using that piece of gear often. Perhaps this point could also read, buying gear is not very cost effective if you are only using that equipment a few times per year. Let’s use an example, if you are only going to use a tilt shift lens three or four times per year it is not going to be very cost effective to purchase a pro quality one. At the rental store I use, that same lens can be rented for just $70 for 2 days.

Saving

There are significant financial benefits if you don’t have all your money tied up in gear

Reason #2 – Renting leaves cash flow free to invest in promotional activity. When you choose to rent instead of buy it leaves cash in your business to spend on sales and marketing activity. That activity then generates more jobs for you. Instead of tying up your money in gear, renting leaves you cash to promote your business.

Reason #3 – Renting allows you to tackle a broader range of jobs. Any photographer is limited in what jobs they can take by the equipment they have. Renting gives you access to an almost unlimited range of equipment, which greatly increases the types of jobs you can tackle. Whether you need a 600mm lens, a specific lighting rig, or a super high mega pixel camera body, they can all be rented. Don’t let your equipment limit your business. Use rental gear to expand the number of possible jobs you tackle.

Kids jumping

Be radical. Leave your gear at home and pick up rentals at your destination.

Reason #4 – Renting gear at your destination means fewer headaches when you are travelling. Most photographers have a close affinity with their equipment. We get used to the camera bodies and lenses we use. But travelling with them produces some anxiety. Will all my cameras and lenses make it through the airport ok? Will I be able to carry all that gear onboard? If I check them in, will my bag get lost?  So what if you had identical gear waiting for you at your destination? Try it. Jump onto a flight with just your memory cards, and leave the rest to the rental company. Top quality gear and no travel anxiety.

Reason #5 – Renting let’s you work with the latest equipment. Most photographers don’t buy new camera bodies and lenses the moment they are released. I use Canon equipment and shoot with a 5D. It’s not the latest model. I have a range of L series lenses. Some are also not the latest model. Here’s an added benefit to renting, it gives you access to the latest models and the best technology.

Save money

Renting saves on your insurance as well

Reason #6 – Renting equipment rather than buying saves on your insurance bill. For gear I own, I choose to have it insured so if I lose of damage it, it will be replaced. That comes at a cost. When I rent gear, it is insured through the rental company’s business insurance. I save by not having to buy the gear, and I save again on my insurance bill.

Reason #7 – Rental equipment from reputable stores is well maintained. I rent my equipment from a well known store. After each rental the equipment is checked and cleaned, so that it is in top condition for the next person who rents it. It’s ironic that rental gear might be better maintained than your own equipment.

flash triggers

If you want to experiment with new kit, consider renting it first

Reason #8 – Renting lets you experiment with new equipment. Have you ever shot with a 600mm lens? Or the latest full frame camera body? Or with pocket wizards? Before you commit the big money by buying your gear, rent them first and experiment. How heavy is that 600mm lens? Does it help me get the results I am after? Renting let’s you experiment before you commit.

Thanks for reading 8 reasons renting pro photo gear makes sense.


Starting Out With Light Modifiers

Many readers of Beyond Here are wanting to take the step into the professional photography ranks. They are looking to make photography a significant part of their income, and then make it their main source of income. Making that leap often means learning the skills and having the equipment to shoot multiple days of the week and in different lighting conditions. In many cases this will bring an ‘outdoor’ photographer indoor where they will need a range of lighting equipment, and the skills to use them. In this post we look at starting out with light modifiers. Here is an overview of the basic equipment.

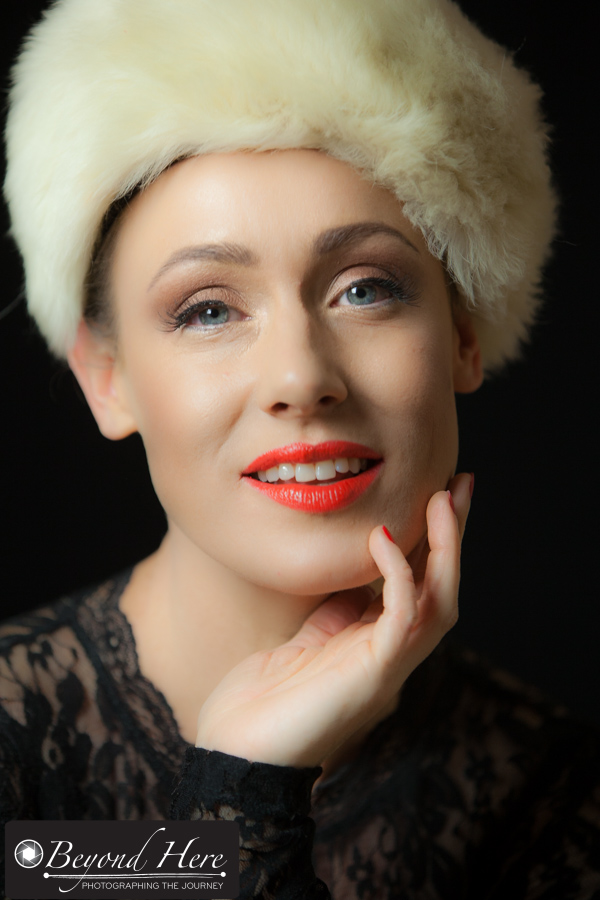
Portrait

This image was shot with a single soft box to the left of camera

Reflector – a reflector is a very simple piece of equipment. They are straightforward to use and simply reflect the existing light. They come in silver and gold which create different levels of ‘warmth’ in the light. Reflectors come in a range of sizes and are cheap and worth having.

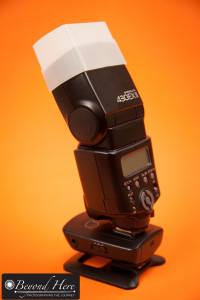
Diffuser

The simplest light modifier is a diffuser for a speedlite

Speedlite Diffuser – a speedlite diffuser is the most basic type of light modifier. They come in various forms, but the most simple is a piece of plastic which fits over the head of the speedlite. They are surprisingly effective in softening the light from your speedlite. They are very cheap and worth getting. The speedlite shown in the diagram is being used off camera. If you have never used your speedlite off camera, please see this post. Learning to use your speedlite off camera and softening the light will open up a new world of lighting opportunities for you.

Reflective Umbrella – umbrellas are ideal for creating soft light across a large area, which makes them useful for lighting groups of people. They are cheap and easy to use. The only disadvantage is that they tend to spread lots of light around. Like the reflector, reflective umbrellas come in different colors – silver, gold and white.

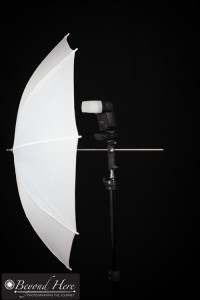
Shoot through umbrella

A simple set up for a speedlite to be fired through a shoot through umbrella

White Shoot Through Umbrella – shoot through umbrellas are great for diffusing light and spreading it evenly. They are simple to use, and as the name implies, you shoot the light through the translucent umbrella. They come in different sizes, so keep in mind that the light will be softer when coming from a larger source. Shoot through umbrellas and reflective umbrellas are very easy to use in an indoor environment. An example is in this post. Be very wary of using umbrellas outdoor. Even a very small gust of wind will catch the umbrella and blow your equipment over.

Scrims – a scrim is a square or rectangular frame with diffusion fabric spread across it. They are typically larger than umbrellas and can be used to create large areas of diffused light. Use a scrim to diffuse light from flash, continuous lights, or the sun.

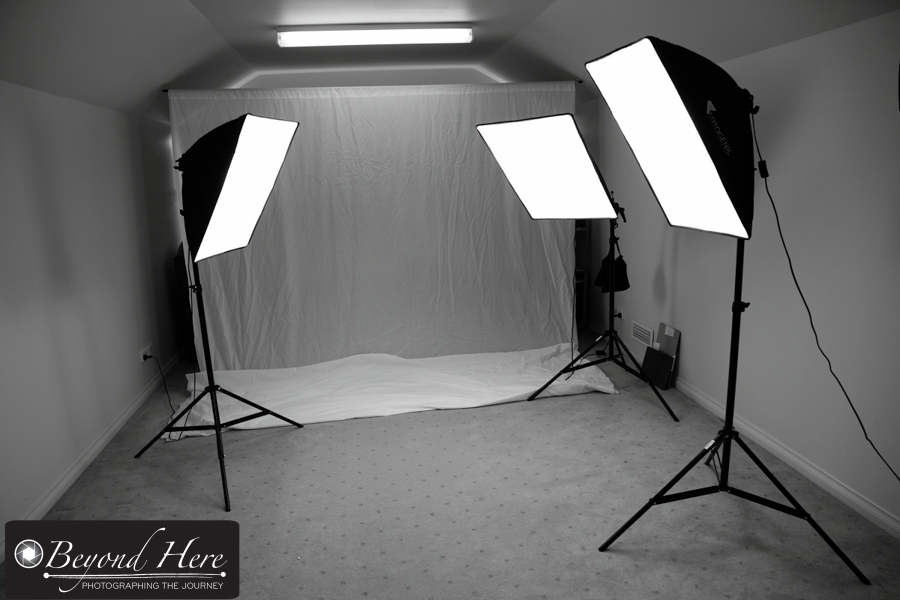
Soft box – soft boxes give the photographer more control of light than umbrellas. Soft boxes are what I use most frequently in the studio environment. They are simple to use and avoid light spreading everywhere in the studio environment. Soft boxes come in a range of different sizes from small to very large. Choose which is most appropriate for your lighting needs and your space.

Soft boxes

An example of soft boxes in a simple studio environment

That covers the very basics of starting out with light modifiers. This post only touches the surface of a large subject. I’ve done it without mentioning beauty dishes, gridspots, Fresnel lights, or an octabox! Thanks for reading starting out with light modifiers. I hope it has demystified light modifiers and given you the encouragement to begin modifying your light.

What Do You Need for a Mobile Photography Studio

Producing high quality portraits in different environments can be challenging. There can be issues with lighting, backgrounds, even models! So, how do we have the best chance of creating strong portraits – we take our equipment with us. What do you need for a mobile photography studio? Read on.

Single light portrait

This portrait was shot with a single light to the right of camera

Here I have outlined the minimum gear you will need to have a mobile studio. Sorry, if you were hoping I’d give you reasons to buy thousands of dollars worth of new gear! I have taken the opposite approach – and will show you just how affordable it can be to have simple mobile equipment which will allow you to shoot strong portraits in different locations. As you will see this set up is best suited to indoor conditions where you are trying to generate professional quality light with the minimum of fuss and effort. First, we need a light source. The simplest way is to have one external flash unit. Not the pop up flash on the top of some cameras, but a separate flash unit. This will enable us to control the level and direction of light in any situation. Most readers of Beyond Here will already have an external flash unit, but if you don’t, you should consider getting one. You really can’t produce excellent quality portraits using pop up flash. Once you do have an external flash unit, you will have flexibility in how you light your subject.

flash photography

A flash unit and radio trigger mounted on a light stand

Once we have a light source we need to know how to use it! For simple portraits we want just one light, but we will need a light stand to put it on. Once we have a light stand we can position the light anywhere relative to our subject. At the online camera store I use, you can currently buy a 1.8m light stand for $30. Light stands are very handy, and pack up to a manageable size to carry. Mine fit inside a small bag, making them easy to transport.

Ok, we have a flash unit and a light stand. What’s next? The light produced from a single flash unit will be harsh. To create high quality portraits we need something to soften the light from our flash unit. For this, I mainly use a shoot through umbrella. A 33 inch umbrella at my favorite online store is currently $35 (though they are often much cheaper than this. Bring on the sales!) When we fire the flash through the shoot through umbrella it will produce a soft, flattering light.

flash

The umbrella fits into the swivel adapter

To mount the camera and umbrella we need a simple adapter which fits on the end of the light stand. If you haven’t done this before, it is this piece of equipment which often gets overlooked. It is often referred to as a ‘swivel umbrella adapter’. The current price at the online store I use is $34. Look out for them in your camera store.

The final piece of the lighting puzzle comes with having something to fire the flash while it is off the camera. A simple option here is a radio trigger (I wrote a separate post here about how to use flash triggers). To make radio triggers work you place one in the hot shoe of your camera, and attach your flash unit to the other one. When you press the shutter button the trigger on your camera sends a signal to the other trigger, and fires the flash. Cool eh? A pair of radio triggers is currently just over $100, though you can get them for half this price when they are on sale.

With this small amount of equipment you are now ready to go. The equipment is easy to carry, with the light stand being the bulkiest item.

(If you want to be able to control your background as well, you can buy a ‘pop up’ background. I have one of these which is black on one side and white on the other, cost $100. It is useful, particularly for shooting corporate portraits on a black background. If you are not ready to buy one, look for a plain wall to use as your background and position your subject 2-3 meters from the wall.)

So there you have it – what do you need for a mobile photography studio – in a few easy steps. Note, this set up works very well in indoor situations. If you are using it outdoors, be careful with the shoot through umbrella. Even a small amount of wind will catch the umbrella and blow your light stand over. Not a good look!

Thanks for reading ‘what do you need for a mobile photography studio’.

Newborn Photography Props

Today’s post on Beyond Here is from Julie and Victor at Propjar.

Propjar is all about props. They supply photography props for newborn, maternity, family and portrait photo shoots. Based in Melbourne, Australia they ship their products worldwide. For shipping within Australia – all shipping is currently free. And for international addresses, shipping is currently free for all orders over $50. Check out the Propjar website for more details. Read on for more about newborn photography props.

Silk extravaganza for newborn photography!

Newborn Photography

Propjar daffodil silk swirl being used as a basket stuffer. Image copyright Kelly Gladwin.

The current trend in newborn photography is creating organic images, whether it’s in gorgeous neutral tones or with splashes of bold color.

A lot of the products used to create these images are very hard to clean, and some, in particular synthetic products, can be very harsh on baby’s skin.

Natural silk is the solution!

Silk is super soft and squishy, and gives a gorgeous natural, organic feel to images. Not only is it very gentle on baby’s delicate soft skin, but it always amuses us how parents just can’t get enough of touching the silk and exclaiming with ooooh’s and aaaaah’s.  And because these little clouds of softness can be gently hand washed after each photo shoot, you’ll be able to use them many times over. As a newborn photographer, you will know just how much cleaning is involved after a newborn shoot. To have a product that cannot be cleaned properly can become a real headache.

Newborn photography

Propjar snow silk swirl being used as a wrap. Image copyright BeccyRose Photography.

We highlighted in our maternity photography props post that building a bond and rapport with your mum-to-be client, and understanding what she’s comfortable with, was critical for building a relationship that can lead to follow up business, such as newborn photo shoots.

The same applies to the parents of your newborn client. Making sure baby is comfortable and safe with whichever props you choose to use to capture this special moment, will help you in building this bond and trust with the family.

Newborn photography

Image copyright Jamie Lee Photography

If you’re able to do this, you’ll be remembered when it comes time for baby’s one year old birthday cake smash, toddler portraits, family portraits and any other photo sessions the family may want.

Image copyright Emily Clare Photography

Image copyright Emily Clare Photography

If we can leave you with one tip, it’s that in business, it’s far easier and cheaper to sell to existing clients who are also fans you’ve connected with, than it is to find new clients. That’s why connecting with your fans / clients is so important to building a thriving and sustainable business.

At Propjar we’ve created a range of silk props available in 22 colors.

Our super soft silk swirls can be used as a wrap, layer, or basket stuffer.

Combine the nest with layers such as the Propjar stretch wrap. Image copyright Jamie Lee Photography.

Combine the nest with layers such as the Propjar stretch wrap. Image copyright Jamie Lee Photography.

The versatility of the Propjar silk nest allows has proven to be a real hit with photographers and their clients. These nests come with a removable cover, with extra covers available to purchase, so that you can change the color of your nest to suit your theme.

Look at those gorgeous eyes! Propjar silk swaddle sack being used with a silk nest. Image copyright Siobhan Wolff Photography.

Look at those gorgeous eyes! Propjar silk swaddle sack being used with a silk nest. Image copyright Siobhan Wolff Photography.

Because this soft nest ring makes it easy to pose both newborns and older babies, you’re able to give parents who may have left their newborn photo shoot a bit late to still get wonderful memories of baby. The posing options are endless. Use it as is on an old wooden floor with character, or perhaps a posing faux fur. Or anything else your creativity allows.

Thank you Julie and Victor at Propjar for this post for Beyond Here. Newborn photography props can assist in creating outstanding images. If you are looking for a great source of those props, please visit the Propjar website.
Maternity Photography Props

Today’s post is the first in a series of guest posts from Propjar.

Propjar is all about props. They supply photography props for new born, maternity, family and portrait photo shoots. Based in Melbourne, Australia they ship their products worldwide. For shipping within Australia – all shipping is currently free. And for international addresses, shipping is currently free for all orders over $50. Check out the Propjar website for more details. Read on for more about maternity photography props.

Maternity dress

Propjar is based in Melbourne, Australia with shipping available worldwide. Picture copyright Southern Haze Photography

Capturing the journey of a mum-to-be in a maternity shoot has become a popular way to record one of the most special moments in the life of a young family. This moment that has been entrusted to you as a photographer is truly a special one, and one that can set your photography business apart through building a unique bond with your customer on this journey. Building this bond and rapport with your customer is crucial in knowing how to capture this special time. There are many styles of gorgeous long flowing dresses that can be used, for example a long flowing dress such as the Pink Lace Maternity Dress below, that splits in the middle. The crucial part of all of this is understanding your customers personality and what they are comfortable with. Remember, this is about their journey, and how they would like to share their journey with family and friends.

Maternity dress

A Propjar pink lace maternity dress used on this glowing mum. Copyright BeccyRose Photography

One way of using the Propjar Lace Maternity Dress can be as a skirt with the sash as a bodice. This has been used to great effect in this photo.

Maternity dress

Propjar maternity dress. Picture copyright BeccyRose Photography

Here’s the thing, not all women feel confident enough to bare their bellies. Secretly they would LOVE to have images of this magical time, but are not all together comfortable doing it. This is a potential sale lost to your business. As a photographer you have an opportunity to show how magical the moment in maternity photography can be, setting yourself apart from other photography businesses. This may be what also leads a potential customer to choose you to capture their family’s special moments once their newborn arrives. One way to ensure you have the comfort of your customers in mind is to invest in a few dresses that are not all that revealing but still celebrate the pregnant form.

Grace Dress

Propjar Chiffon Maternity Dress. Picture copyright Southern Haze Photography

For example, the Propjar Grace Dress in this photo comes in a range of colors and is a soft, flowing dress.

Stella Maternity Dress

Propjar Grace Dress. Picture copyright Southern Haze Photography

Maternity Dress

Maternity dress used in an outdoors setting. Picture copyright Southern Haze Photography

The Propjar Stella Maternity Dress in this photo has a beautiful, timeless vintage look it which captures the moment perfectly.

Let Propjar help you to create beautiful maternity images so that ALL women not only feel comfortable, but beautiful while capturing this special time in their lives.

Thank you to Julie and Victor at Propjar for this post for Beyond Here. Appropriate maternity photography props can really help a photographer create outstanding maternity images. If you are looking for a great source of those props, please visit the Propjar website.


Flash Batteries That Last

Over this weekend I fulfilled my role as a Melbourne wedding photographer, by shooting a wedding in Doncaster. It was a full day shoot, starting at 10.45am with preparation images, continuing through the ceremony, a garden location for couple and family images, and then the reception. My second shooter and I finished up just after 9pm. I carry backups for all key equipment – 2 camera bodies, 4 lenses, multiple memory cards, and lots of batteries. Recently I changed the brand of batteries I use and have found flash batteries that last.

Eneloop batteries

Eneloop batteries managed a 10 hour shoot without needing to be changed

The brand of batteries I use now is Eneloop. Prior to using these, I have used all the major battery brands. I predominantly use rechargeable batteries, but have also used the non rechargeable ones as well. That normally means changing flash batteries several times during the day to make sure I am not let down by the batteries recycling at a critical time and missing a key shot.

That has all changed with Eneloop batteries. I carry 2 flash units with 4 AA Eneloop batteries in each. (Because I use 2 flash units they are only working half as hard as a single unit might). I used the flashes intermittently throughout the 10 hour day, and extensively during the evening reception. I didn’t need to change batteries for that entire time and the flash was recycling just as fast at the end of the day as it was at the beginning. These are flash batteries that last.

Moving to Eneloop batteries has eliminated one additional thing to plan for on wedding days – changing flash batteries. While I will still carry backup batteries, I am not expecting to need them. This allows me to focus on the client, and making great images.
If you are looking for flash batteries that last – I recommend looking into Eneloop. I bought mine online, and have found they are available from all the major online retailers of batteries.

Disclosure – please note, that I recommend Eneloop batteries as I use them myself and have found them to be superior to the previous batteries I had been using. I don’t receive anything from Eneloop for promoting their products.

Thank you for reading – Flash Batteries That Last. If you would like to receive regular updates from Beyond Here, please add your email address to the sign up box.

What are Continuous Lights

In an earlier post on Beyond Here, we discussed How to Build a Home Photography Studio. In that post, I provided a brief overview of the requirements for space, backdrops, and lights. Once you have decided to set up a home photography studio, the decision on lighting is the most complicated and expensive decision. Your choice is between strobes and continuous lighting. Many photographers are familiar with the concept of strobe lighting – they work like large flash units, emitting a short burst of bright light. In this post we look at the question, what are continuous lights?

Very simply, continuous lights are always on. Rather than emitting a short burst of bright light, they emit a continuous stream of light.

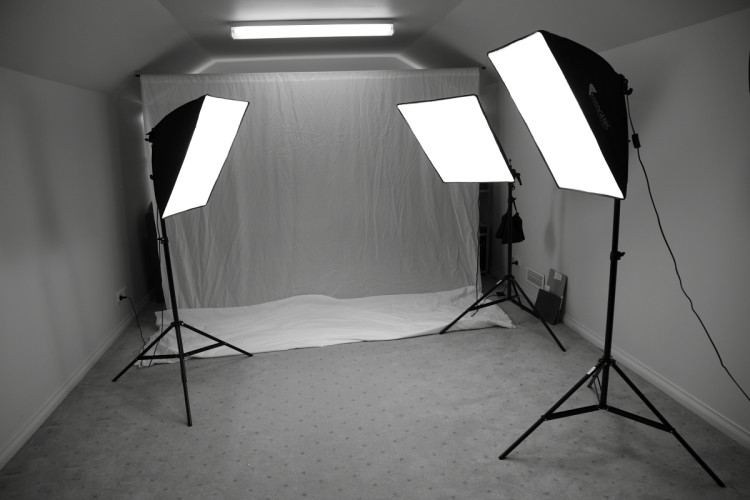
Continuous lights

An example of continuous lights in a home photography studio

So why use continuous lights? Continuous lights have several advantages over strobe lights.

  • What you see if what you get. With continuous lighting the effect on your subject can be seen before the shot is taken. If you want to alter the way the light appears, you can adjust your lights or subject and see the impact before taking the shot.
  • They are easy to use. If you are new to studio lighting, strobes can be daunting to learn to use. With continuous lights you literally turn them on and then position the lights and subject to achieve the desired look. They are very straightforward to use.
  • Continuous lights can be used for video. It is increasingly common to shoot video with a digital SLR camera. Continuous lights can be used to shoot video – meaning you can shoot both still images and video in your studio using one set of lights.
  • They are fairly affordable. The exact price of continuous lights will depend on your location, the number of lights  you want, and the power of those lights. It is worth checking with your local photography store or online shops.

To assess whether continuous lights are the right choice for you, it is worth knowing that they have some disadvantages in comparison to strobe lighting too.

  • Continuous lights are not as bright as strobes. If you want to ‘freeze motion’ in the studio you will be more effective in using the short, bright burst of light from strobe lighting.
  • Continuous lights need a steady power source. If you are planning to leave your lights in your studio, then continuous lights work very well. But if you want your lights to be portable, strobes will be a better choice.
  • Strobe lights give you a lot more options in terms of power. With strobe lights you have greater control of the power output from each light, giving many more lighting options in your studio.

I hope this post has been useful in understanding what are continuous lights.