Category Archives: Photography Tips

Tips to improve your photography

7 Tips for Your First Wedding Photography Job

Number 7
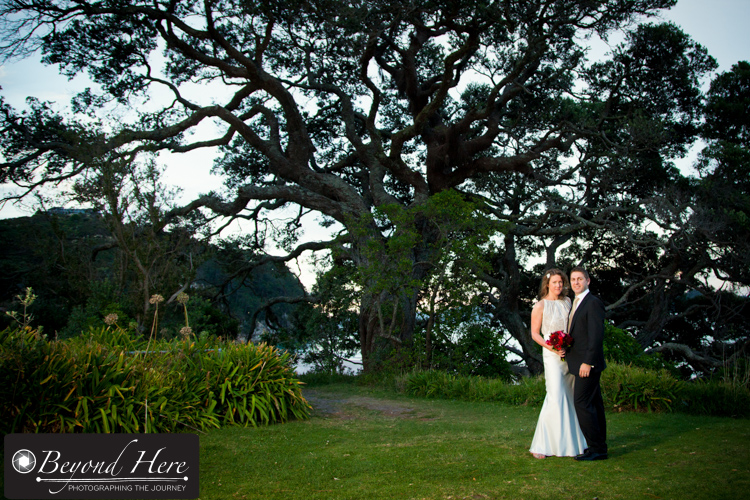
Last weekend I photographed a lovely wedding in the Yarra Valley in Victoria, Australia. I had a talented photographer assisting me – it was her first wedding photography job. Like all weddings, it was a challenging, exciting, and tiring day. We discussed many elements of shooting a wedding in the days prior, and on the day of the wedding. Today I condensed these into tips for your first wedding photography job. I listed all the tips and have come up with 28! But lets start with 7 tips for your first wedding photography job. Depending on reader feedback, I will add extra posts with additional tips.

Tip #1 – Expect a Long and Tiring Day. Wedding photography is often an all day event and you need to prepare for a long day. This weekend, we started at the bride’s house at 11am and left the reception just after 10.30pm. Expect a long day and pace yourself. Take something with you to eat. Drink plenty of water. Don’t expect the couple to provide everything for you. We took snacks and drinks in the car and had them as we travelled.


Tip #2 – Fit With the Couples Needs. I previously wrote a post called Preparing For Wedding Photography Success where I talked about the importance of knowing your client and what they want on their wedding day. You need to have prepared for this in advance. If the couple don’t like posed kissing shots – don’t ask them to pose and kiss. Fit in with what they want. If they want informal, documentary style wedding photography – that’s what you need to deliver. If formal family portraits are important to them – make sure you shoot formal family portraits. Deliver what the couple wants with your own unique approach.

Wedding

Surprise the bride and groom with a special image or print

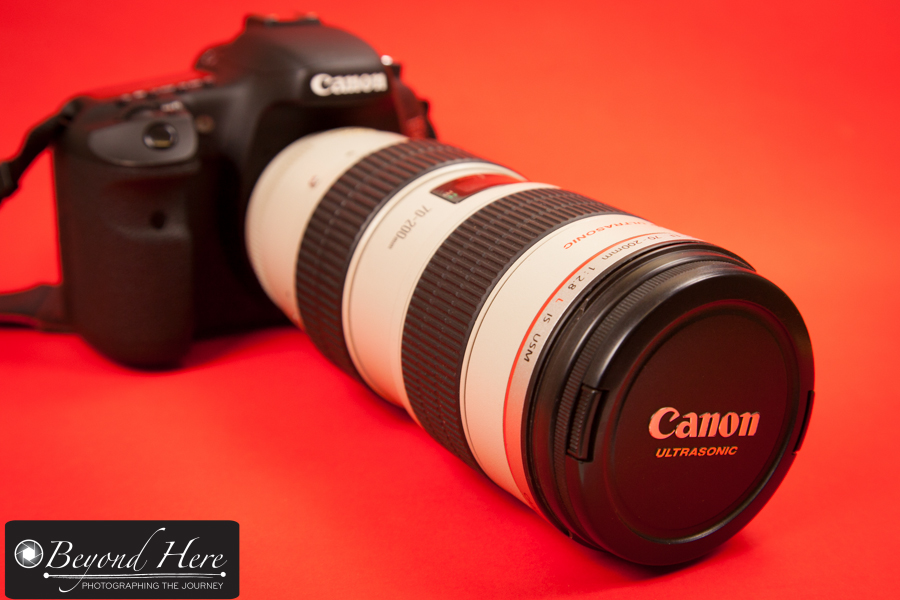
Tip #3 – Know Where Your Gear Is. Weddings are busy. You will be carrying your gear and putting it down. Picking it up again, moving, putting it down again. It is critical to know where you gear is at all times. I carry a fairly small bag with all the equipment I expect to use in it. I have back up gear and additional equipment which I leave in the car. In my bag – each piece of equipment stays in one place. If I need additional batteries I know where they are. If I need a new memory card, I know where they are. If I need a different lens – it has its place and I know where to find it. Earlier this year I was at a wedding where the photographer was about to leave the bride’s house to go to the ceremony. He suddenly realized that he didn’t have his 70-200mm f2.8 lens with him. It wasn’t in his bag – he had left it in the bride’s house. The bride had locked the door when she left and the photographer couldn’t get back in. After several frantic phone calls, he got a key from a neighbor and was able to retrieve his lens. A happy ending to a very stressful few minutes. Once you have finished using a piece of equipment put it back in your bag – don’t leave it on the kitchen bench.

Tip #4 – Change Memory Cards and Batteries During Down Times. It looks really unprofessional to change your batteries or memory cards at a key moment in the wedding day – particularly during the ceremony. Change batteries and memory cards during the down times. For example, when you have shot all the ‘getting ready’ images and are driving to the ceremony – this is an ideal time to change batteries and memory cards. You don’t want to have a full memory card a moment before the couple are pronounced man and wife!

Tip #5 – Don’t Overshoot. It is an easy mistake for a beginner to make to overshoot – that is to take too many images. For example, when the bride is getting ready and doing her hair and make up, you need only a few key images. There is no point in having 50 shots of her hair being done if you are only going to use 1 in the album. Take the key shots you need. When you are confident you have an ‘A grade’ image, move on or take a quick break. Don’t overshoot.

Make Up

Don’t overshoot. Get your key shots and move on.

Plan sign

Plan your travel times and leave a buffer

Tip #6 – Plan Your Travel Times and Leave a Buffer. Travelling between locations can be very stressful if you don’t allow enough time. Last weekend, we started at the bride’s house, then traveled to where the groom was getting ready, went back to the bride’s house, and on to the venue for the ceremony and reception. They were all within fairly close proximity and so it was not too difficult. For a 30 minute drive I allow 40 minutes. Then a small delay in traffic or through road works are not enough to stress me out. Plan more time than you really need. Then you can check your shot list before you walk into the next venue.

Tip #7 – Surprise the Bride and Groom. I like to provide a positive surprise for the bride and groom to finish their wedding day. At the end of the day they will be feeling a sense of tiredness, relief, and excitement. I know some photographers who surprise them with a print. They take an image early in the day, and while the ceremony happens, they are having a print made. At the end of the reception the photographer presents it to them. I like to get home and pick a few key images. I quickly edit them and email them to the bride. She has a high quality image to show friends and family the next day. Often that image gets posted on social media the next day or carried on a smart phone and shown to friends and family during the honeymoon.

So there we are – 7 tips for your first wedding photography job. Please let me know your comments by adding a comment to this post, or emailing me at craig@beyondhere.com.au I have 21 more tips to follow!

If you’d like to automatically receive a weekly update from Beyond Here please sign up by adding your email address at the top of this page. Thank you for reading 7 tips for your first wedding photography job.

Preparing for Wedding Photography Success

Wedding photography can be challenging, exciting, stressful, exhilarating, and exhausting – all at once! I am shooting another wedding this weekend and have spent time making sure that I have everything in place to be able to perform at my best on the day. The more preparation I do before the wedding day, the less I have to worry about, and the better my images are. Rather than hoping for the best, I focus on preparing for wedding photography success. Here are some tips which might be useful to you.

Wedding Photography

Taking time to understand what your client is looking for is important

Sorry if you were hoping this would be a “what’s in the wedding photographer’s bag” type post. Instead, I’ve condensed my preparation into 7 checkpoints.

Checkpoint 1 – Do you really know your client?

Wedding Photography

Meeting your client face to face helps to establish a relationship and helps you understand what they are looking for

Where it is possible I like to meet face to face with my client at the time they are selecting a photographer. It gives me a chance to make a personal connection with the bride and groom, to understand the dynamic between the couple, and to focus on what is important to them in their wedding photography. The couple I am shooting for this coming weekend, I met over a year ago at their home. We spent time discussing the wedding day and what was important to them. They are ‘car people’ and even showed me around the vehicles in the garage (this was a good sign they were planning to book me!). In the last 2 months I have been in touch with them via email and phone to understand how the wedding planning was going. Last weekend I visited them to go through the timings for the day and to re-visit the notes I made a year ago. I now have a good understanding of what is important to them, and am looking forward to the wedding.

Checkpoint 2 – Is the paperwork in order?

If you are thinking ‘what paperwork?’ you may need to do more preparation before launching your wedding photography career. It is ok to shoot your friends wedding without a contract, but for all other clients you will need a contract. Included are the terms and conditions of payment. My clients for this weekend have had a copy of their contract for over a year. They signed it at the time of the booking and paid in full 4 weeks ago. During the wedding I won’t be wondering if I am going to get paid. Don’t over look this checkpoint – it is key to preparing for wedding photography success and will go a long way to ensuring financial success as well as photographic success.

Checkpoint 3 – Have you visited the venues?

Wedding photography

Visiting the venue lets you plan your key shots

It is very important to have visited the venue for the wedding in advance. It gives you time to look around and plan for where your key shots will take place. At the venue I will be shooting at next weekend, they display a range of sample albums. Looking through them also gave me some great ideas which other photographers have used. I now feel well prepared – particularly to make the most of the short time between the end of the ceremony and the start of the reception. I know which camera body and which lens I will be using at each location on the property. I know the style of shot which will suit my client. I know where my assistant will be and what she will be doing.

Checkpoint 4 – Are the logistics sorted out?

By logistics, I mean some of the practicalities of the day. For next weekends wedding there is a small chapel at the bottom of the property, and the reception venue is several hundred metres away. Thinking through the logistics, I will park the car near the chapel, as I will need to grab the step ladder for the ‘all guest’ shot. Rather than driving and re-parking I will walk up to the reception venue. No stress, I know where the car is. Car parking is just one element of the logistics. The more you can consider in advance, the less stress you will have on the day. Less stress generally means better images and happier clients.

Checkpoint 5 – Do you know the wedding party’s names?

The wedding party aren’t directly your clients, but they are normally family or the best friends of the bride and groom. Often they are lifelong friends. Taking the time to learn their names and using them, is one small way to show the bride and groom that you care about them and their day. It is not hard. I am looking forward to meeting Spiro – the best man – this weekend. If I strike up a good relationship with him early on the day, I might ask him to help with ‘crowd control’ after the ceremony. Often the best man loves to play a key role and it helps deal with his nerves if he is making a speech at the reception.

Checkpoint 6 – Which are the key shots?

It is easy to think on a wedding day that they are all key shots. What I mean here is, which are the shots you plan in advance which you anticipate the bride and groom will print and hang on their walls at home? Which shots capture the venue, the couple, and the day all in one? Based on what you know is important to the couple, which shots are going to mean the most to them? For my couple this weekend it will involve the grooms vehicle and driving into the future together. There will also be shots of the wedding party, candid moments, the ceremony, the guests, family formals, and kids being kids – but I anticipate the ‘winning shots’ to involve the bride and groom and the car. It will show their love for one another, a beautiful venue, and their passion for motor vehicles.

Checkpoint 7 – What is the weather forecast?

Wedding Photography

Checking the weather forecast gives you time to plan indoor and outdoor shots

If your wedding involves shooting outdoors during any part of the day, you will need to consider in advance what the weather forecast is. You can’t rely on beautiful soft light from a bright cloudy day for every wedding you shoot. What is the plan if there is bright sunlight? Or pouring rain? Or both within a few hours? Have you spoken to the venue to ask their advice on wet weather options? Late August can bring some very changeable and cold weather in Melbourne, Australia. Fortunately the forecast for this weekend is sunny, clear and cool. It should mean flexibility to shoot both indoor and outdoor images throughout the day. (I hope it is the same for the wedding I am shooting the following weekend!!)

I am a strong believer in preparing for wedding photography success. The more elements I have planned for in advance, the more I will be able to focus on photography on the big day. You don’t have to use my checklist, but I encourage you to plan in advance. Having a system in place gives you the best chance to shoot great wedding images and enjoy yourself at the same time. Invest the time in preparing for wedding photography success!

Simple Stock Concepts

Earlier this week I wrote a post called Starting in Stock Photography. I have had several people contact me who, since reading that post, have opened microstock photography accounts and become approved contributors. How very cool! Within a week, they have gone from enthusiasts – to being able to generate an income from their images. This post looks at where to next, starting with simple stock concepts.

When your first become an approved microstock contributor there is a tendency to want to upload all the images that sit on your hard drive – pictures of flowers, trees, landscapes, and anything else you have. There is a perception that it will just be a matter of uploading those images and waiting for the money to roll in. Danger sign! While it can feel like progress to have images in your account, most contributors find that this burst of energy produces very few downloads.

So, what should you do?

Stock photography has a huge range of uses. Many of those are websites or print material which help to tell a story. Images which help to tell a story are going to do better than plain landscapes or pictures of flowers.

Let’s look at some simple stock concepts and images.

Stock Photo

A simple stock concept, bullying

The first image is one which shows a concept of bullying. It was shot outdoor, on a cloudy day. This is a simple image of a much-talked-about topic. The subject is clear, and the message is clear. Some space around the subject also gives room for a graphic designer to crop the image or to add some text on the wall to the left. Don’t think that a successful stock image has to be a masterpiece, simple stock concepts executed well are the key. I have used this image on Beyond Here before. It is a good example of a simple stock concept. It was shot and uploaded in 2012 and has been downloaded more than 400 times.

Finance

Finance concept

In the second sample image – I chose to show an example which doesn’t involve a model. Stock images can be shot with household objects and simple lighting. This shot did use a studio soft box, but could have used a lamp or window to light the subject. It was shot with a macro lens, and with a black sheet as the background. Finance and business themed images are popular.

Strike

Concept – blue collar worker on strike

The third image is a more specific theme, a blue collar worker on strike. The models clothing has been themed appropriately. Again, this is a simple image which communicates a clear message. This style of image will be slightly more challenging for the beginner to achieve as it involves multiple light sources. When you are ready to move on to having different light sources, have a look at this post to learn how to shoot this image.


Stock

Household objects can be used to create stock images

The fourth image utilizes ‘props’ which you can find at home. This is a normal kitchen jar, some money, and a sticky note. The blue background is a poster size piece of paper. In this case the lighting comes from studio soft boxes, but a similar look can be achieved by placing the subject and background near a large window.

Rather than uploading all the old images sitting around on your computer, I recommend:

  • thinking up image concepts
  • research what is already available in image libraries
  • focus on shooting clear, simple images which tell a story
  • repeat this process!

If you have questions from this post, please leave a comment. If you would like to receive a weekly email from Beyond Here please sign up in the box at the top right of this page.

I’m excited that people who read last week’s post have taken action and set up their own microstock accounts. I hope this post helps them in the next step – building a portfolio and generating their first downloads. Good luck in shooting simple stock concepts!


My Home Town Favorites

Today’s post is about some of my home town favorites – special places in Melbourne, Australia that offer great opportunities for a photographer. Melbourne is a super place to live with lots of very good photography spots. It was hard to limit it to 5 places – but maybe I’ll write another post with another 5 one day. So, where are my home town favorites?

Melbourne is known for hosting great sporting events (among other things!) There is:

  • Melbourne Cricket Ground which hosts cricket test matches and AFL football
  • Etihad Stadium which hosts AFL football, and occasional soccer, rugby, rugby league games
  • Rod Laver Arena which hosts the Australian Open Tennis tournament every January, and
  • Albert Park Lake which the Australian Grand Prix races around

But none of those places have made this list of my home town favorites. So what has made the list?

Brighton Beach. Brighton is a well known suburb next to the beach in the city’s south east. It is well known for the colorful bathing boxes along the beach. They are great to photograph particularly at sunrise and sunset. They can also look great during a storm. As well as the bathing boxes, the beach provides great photo opportunities. I particularly like sunset in the summer time. Low tide can mean great silhouettes of people walking on the beach with the sun setting behind them.

Brighton Beach

Brighton Beach. Summer, sunset.

Yarra Bend Park. This large park area is just 4 kilometers from the city center. It is an extensive area which includes picnic areas, walking tracks, and a golf course. There is a road through the park area, and car parking available. At one spot, there are great views back to the city. On most evenings in the summer you will find people have stopped to see sunsets like this.

Melbourne

Melbourne cityscape taken from Yarra Bend Park

Yarra Bend Park. Yes, Yarra Bend Park again! It is a big park area. On one side are views of the city, and in another area is the Yarra River. Here you can see these spectacular flying foxes. There is a very large colony of them. This place featured in a previous post called Favorite Wildlife Photography Locations.

Yarra Bend Park

There is a large colony of grey headed flying foxes in Yarra Bend Park

City walks along the Yarra River. The Southbank area next to the Yarra River is a great place to shop, walk, and eat. There are a large range of good restaurants, coffee shops and places to relax near the river. For the photographer, there are also great views of the city buildings. Take a walk anywhere from South Wharf right through to the Melbourne Cricket Ground. Both sides of the river provide great views, with several bridges to go across when you are ready.

Melbourne

Melbourne city from Southbank

Wedding Venues. Melbourne is blessed with some lovely wedding venues. Some of my favorites are in the Yarra Valley and Dandenong Ranges which highlight beautiful bushland just outside the main city areas. But my (current) favorite wedding venue is an inner city venue – St Michaels Church on Collins St. I shot a wedding there in October 2013 and it offers so many options in close proximity. The church itself is a magnificent building. Within a short walking distance are inner city laneways, classic tramways, parliament building, funky coffee shops and restaurants, the Yarra River, Federation Square, and Flinders Street Station. This shot is taken just behind the church. Melbourne’s famous weather added the light rain which helped reflect the brides dress. Nice one!

Wedding

Melbourne has some great inner city wedding photo locations

These are my home town favorites. Do you have home town favorites to share?

Favorite Wildlife Photography Locations

This post looks at one of my favorite wildlife photography locations – Yarra Bend Park in Melbourne, Australia.

Flying fox

Grey headed flying fox showing off its wingspan. Yarra Bend Park, Melbourne, Australia

Where is it?

Yarra Bend Park is 4km north east of the Melbourne central business district in the suburb of Kew. If you are familiar with Melbourne, it is also close to Abbotsford, Collingwood, and not too far from Richmond. It is a 260 hectare park, which makes it the largest area of natural bush land close to the city center. In the area are large residential areas, bush land, parks, sporting fields, and golf courses. The Yarra River winds its way right through Yarra Bend Park. The area is popular with cyclists, walkers, mountain bikers, and has a great lookout area which provides views of the sun setting behind the city.

How do I find it?

I first went to Yarra Bend Park in 2008 when I was invited to play golf at the public golf course there. I have since found out that it is well known in Melbourne, but I had not been there before 2008. My round of golf, which I remember being a particularly bad (!), was the first of many trips.

What can I do there?

Actually, more than I realized! I looked up the Parks Victoria website and it shows that you can do walking, jogging, golf, fly fishing, picnic, sports, eat at the restaurant, visit Studley Park boathouse, and see Dight Falls.

Flying Fox

Position yourself to get clear background for your image

But the main thing I go to see are the huge number of grey headed flying foxes. They roost in the trees next to the Yarra River in very large numbers. There are publicly accessible walkways through these areas on one side of the river. You can see them hanging upside down in the trees, sometimes sleeping, sometimes interacting with each other, and now and then keeping an eye on you! If you had a view that bats or flying foxes did nothing during the day, that’s not the case. On most times I’ve visited there is plenty of noise and movement, and it is fairly straightforward to get images of bats in flight. In early summer, October and November, if you look closely you can also see them flying with their babies clinging to their chest.

About Grey Headed Flying Foxes

Grey headed flying foxes are the largest bat in Australia. They have a dark grey body, a light grey head, and reddish-brown fur around their necks. The  adults have an average wing span of 1 meter and can weigh up to 1 kg. They rely on sight to find food, and so they have relatively large eyes for a bat. But the thing that strikes you when you see them at Yarra Bend Park is just how many there are. It’s a huge thriving community of bats!

What Equipment Should I Take?

Canon lens

The Canon 70-200mm f2.8 lens

While there are a lot of flying foxes at Yarra Bend Park, they are small animals and will often be some way off in the trees. To get close up images of them, you’ll need at least a 200mm lens. Even better is a 300mm or 400mm lens. (All the images on this post were taken with a 200mm lens.) For camera bodies, I use my Canon 7D for the high burst rate. It is ideal for taking images of these flying foxes in mid air. And I always take several memory cards. It is easy to take plenty of shots in burst mode and I don’t want to run out of memory.

What Types of Shots Can I Get?

Due to the large numbers of animals here, you can get a range of different images. It is possible to get these shots of flying foxes:

  • hanging upside down staring straight at you
  • interacting with each other seemingly oblivious to any humans nearby
  • in flight
  • isolated against a grey or blue sky
  • in silhouette against the sun
  • showing the veins in the wings

How do I Take Shots of Bats in Flight?

Flying fox

Flying foxes gather in big numbers at Yarra Bend Park

Taking shots of the flying foxes in mid flight is not difficult – particularly as there are so many of them. My suggestions for achieving this shot are to:

  • position yourself so you can get an uncluttered background
  • if it is a windy day, get them flying into the wind. They will be going slower which makes this shot easier
  • use the continuous focusing mode on your camera and track them in flight
  • use the burst mode to take a series of images in quick succession
  • use a fast shutter speed. My best images of these animals have been at 1/2500s and faster shutter speeds

Why is Yarra Bend Park a Favorite Wildlife Photography Location?

Yarra Bend Park is one of my favorite wildlife photography spots because:

  1. it is so easily accessible. It is only a few kilometers from the city and there is easy parking
  2. I have visited over 20 times, and the large group of bats has always been there
  3. there are so many animals, that a wide range of images is possible
  4. the contrast of being able to shoot what I consider to be a night animal during the day is unique

Take Me There!

I’ve always thought that Yarra Bend Park would be a great place to conduct photography tours. If you’d like me to take you there, drop me an email at craig@beyondhere.com.au

Thanks for reading all the way to here! I hope you might think of bats differently now. Yarra Bend Park is one of my favorite wildlife photography locations.

Fruit bat

Bat in flight, with baby on its chest

Manly Urban

Today we have a guest post from Renate Hechter from Pure Dynamics Photography in Sydney, Australia. Earlier this year Renate launched a new twist on family portraits – a concept called Manly Urban. In this post, she explains Manly Urban.

Thank you again Craig for giving me the opportunity to post on Beyond Here.

I have the privilege of living near one of the most beautiful areas in the world.  I do not think anyone that has been to Sydney and more to the point, Manly, would disagree with me.  One is surrounded by beautiful expanses of blue ocean, with the heads in the background on one side and Manly beach on the other side.  If you have ever been on the Manly ferry, you would agree that it one of the most iconic and picturesque methods of public transport.  All in all, to be able to have this view, day in – day out, is not only a blessing, but a calling to a photographer.

Manly

Manly Urban. Family portraits with famous Manly backgrounds. Copyright Renate Hechter.

For any photographer, it is important to create a service that is new and different to new and existing clients.  I have come up with the ManlyUrban idea, as people not only love to get some photographs of the area they live in, but it also provide a beautiful and modern back-drop for some stunning and different photographs. Manly also has a huge expat community, so it is a great keep-safe of your “home away from home”.

As you walk around and through Manly, you will realise it is a treasure-chest of scenic and urban areas. Here are some of my favourite areas.

  1.  Manly Ferry/Heads (in the background)
Family portrait

Manly Urban. Families in context. Copyright Renate Hechter.

The Manly Ferry is a tradition.  Since 1855 it is a “must do” for visitors.  It is the way Manly locals commute to Sydney. It operates 7 days a week, day and night.  It is one of the most picturesque and relaxing commutes in the world.  What a wonderful way to include this as a backdrop for a photograph.  The same is to be said for the famous Sydney Heads, which is the 2 kilometer-wide entrance to Sydney Harbour. People from all over the world will recognize it and these are some of Sydney’s most iconic landmarks.

  1.  Manly Corso
Manly

Manly, Sydney, Australia. Copyright Renate Hechter

The Corso is a busy and bustling place.  It provides direct access from the Manly Ferry Wharf to Manly beach.  It is also the main shopping area of Manly.  You get locals, tourists, buskers, mum and babies, school children, toddlers in the playground, retirees, surfers, skateboarders and many more all mixed together and wandering about.  Being photographed in the Corso takes some courage, as soon a crowd of people will gather to see what you are up to.  (My urban ballerina kept her cool in the Corso, even though she was surrounded by holiday-makers).

  1.  Murals
Manly

Murals make vibrant backgrounds. Copyright Renate Hechter.

There are a number of murals in different alley-ways in Manly that provide fabulous backdrops for urban photography.  Note, Manly Urban are not just for children.  My friend, Liz, is a local business owner and a Manly local.  As an artist (www.muktiart.com.au) she loved the opportunity to have a photograph taken in her beloved Manly in an area where the photograph could double as a piece of art.

When you visit Sydney again, make sure you get your Manly fix. You may even see me shooting Manly Urban in different locations! Please STOP and say HI!

Photographing Babies

Recently on Beyond Here we had guest contributor Renate Hechter of Pure Dynamics Photography in Sydney, Australia contribute a post titled Newborn Photography Some Easy But Essential Tips. Coinciding with that, I had the opportunity to photograph a 6 week old baby. Photographing babies is always special, but this was more special as I had photographed the parents wedding in 2012. Here is an outline of how the shoot went, and some insights and tips for photographing babies.

Baby Photography

Work to baby’s needs. If baby wants to stay in mum’s arms, let him or her.

Preparation. We organised the shoot to be in the morning to fit in with baby’s normal routine. We discussed clothing before the shoot, and the parents brought several changes of clothes for baby and for themselves. We concentrated on solid colours which would look good in colour or black and white. We avoided patterns.

The session was held in my studio and in preparation I made sure we had:

  • the heater on, so the room was nice and warm
  • a place where the parents could put their bag
  • a chair where mum could feed baby
  • back drops in place and ready to go
  • lighting in place and ready to go
  • a bean bag handy which we could position baby on
  • 2 camera bodies with lenses on, to save on time changing lenses
Baby Photography

Converting images to black and white helps keep focus on baby and not on any minor imperfections

On the Day. When the clients arrived the baby was wide awake and looking very alert for a 6 week old! It must have been all the new sights and sounds and smells. However, despite all our best preparations baby was reasonably unsettled throughout the shoot. While he was fed several times and kept nice and warm, it was just one of those days where he had other things on his mind apart from being the ‘perfect model’. Not to worry! This is quite normal for really little babies and so it important to remain relaxed – and to keep mum and dad relaxed. In this case, mum and dad were well prepared and not in a hurry so we did have time, and enough cooperation from the model, to get them some ‘A’ grade images.

Shot Plan. I plan my shots and poses before the client arrives and make sure I have any equipment on hand. That is helpful for making the most of the time, but it is more important to remain flexible. If baby wants to stay in mum’s arms – let him or her. There will be time to do all the shots planned, they will just need to be done in an order and a time which baby is happy with.

The Results. Don’t worry – this story has a good end. Firstly, we all had a relaxed and enjoyable time. Baby wasn’t the perfect model, but we all had fun and we have finished with a number of ‘A’ grade images for the family. This was a good reminder to not get stressed if baby is not perfect. You will have a short window of opportunity when baby is settled to get those images you need. Be patient and be ready.

Baby photography

A hat or beanie helps make a baby’s head look normal and to keep warm

Insights. There were several things which went really well from this shoot that are worth taking as insights or tips. They were:

  • ask parents to bring several changes of clothes for baby and themselves. At this shoot, baby had a “call of nature” on his dad. Dad had a change of clothes, so we had no problems and a funny story to tell!
  • include several hats or beanies for baby. A baby’s head can look disproportionately large compared to its body. A hat will make it look in proportion
  • be flexible. This was essential in this session. We worked to baby’s routine and got a good outcome
  • relax. It helps the parents relax too. They need to have an enjoyable time as well as having nice images
  • it’s not about volume. You don’t need hundreds of great shots for very little ones. This shoot is capturing a moment in time, and a handful of good images will do that
  • convert images to black and white. Black and white is very effective in newborn photography. It helps to focus on the beautiful little parcel, and not on skin imperfections or colouring

Do you have a story to tell from photographing babies? Key lessons learnt? Tips for good outcomes?

The Benefits of the Off Season

Right now, in Melbourne, Australia, it is the middle of winter. After a reasonably mild June we have had a cold, grey, windy July. It is a quiet time for weddings, with most weddings being held in the warmer months between September and March. I don’t shoot many weddings at this time of year, so this post covers the benefits of the off season.

I am really glad that my wedding business is seasonal and that there is a quiet time of the year. I wonder what it must be like to be a wedding photographer in Hawaii where there are lots of weddings all year round. Would you ever get a break? How would you re-charge the batteries? How would you stay fresh?

Wedding

The wedding off season is a chance for photographers to recharge

I see lots of good things about having a slower time of year. Here are the key ones – the benefits of the off season.

Rest and recharge the batteries. During spring and summer it can feel like a never ending run of weddings to photograph, images to edit, deadlines to meet, and albums to deliver. It is an exciting time as you watch the brides eyes light up at her new album, and the mother of the bride burst into tears as she sees the large print of her daughter in her wedding dress for the first time. It is also a really busy and challenging time. The more successful you are, the busier you can be. The first benefit of the off season is the chance to rest up and plan for the season of weddings ahead. Life in the fast lane can be great, but life in the slow lane can be a welcome change.

Evaluate your work. Being less busy gives critical time to evaluate your work. How has it improved over this wedding season? Where does it still need to improve? What new edge can I bring for next year? The slower pace in winter gives crucial time to reflect and plan, and prepare for next seasons weddings.

Revise marketing materials. The winter wedding slowdown gives a great opportunity to assess marketing materials and to ask key questions. Does my marketing material reflect what I can bring to a bride and groom? Do they communicate how I am different to other photographers? Do they attract my target client? The off season is a great time to re-assess marketing materials and the marketing plan.

Fruit bat

The off season is a great time to shoot personal projects

Shoot personal projects. In the middle of summer, back to back wedding work makes it very difficult to tackle any other photography work or projects. One of the great benefits of the off season is to shoot personal projects. I love wildlife photography and find the time in the great outdoors to be refreshing and invigorating. This time of year gives me the chance to shoot wildlife projects.

Try new things. The off season is the time I try new things. When I am in the middle of wedding season and I have brides and grooms relying on me, I stick to equipment and techniques I know and have practiced many times. A wedding is the time to deliver a great client experience, not to experiment. Winter gives me the chance to try new styles, new equipment, and new post processing techniques. It’s the time to learn, and learning helps keep us fresh. Photography is a lifelong process of continual improvement and winter is a great time to improve.

Evaluate the business. In Australia, the end of the tax year is in the middle of winter. This is a great opportunity to connect the creative side of a photography business with the business side. How well is the business doing? Where could it do better? What can I learn from other photographers businesses? What can I learn from other creative businesses? The slowdown in client work is a great opportunity to assess whether I am meeting business goals, not just creative goals.

Books

Rest, relax and read in the off season

Read. I love to read and winter is the time that I read the most. Recently I have re-read two books about the business of photography which I highly recommend. They are VisionMongers by David Du Chemin, and The Fast Track Photographer Business Plan by Dane Sanders. Whether you already run a photography business or are considering it, these books are both well worth reading. Another of the benefits of the off season, is the chance to reflect and read, and to learn from others. It helps bring perspective and to open your mind to new approaches.

I love winter and the off season. It is also the time in Melbourne to get to the AFL football! So there you are – seven of the benefits of the off season. What do you like to do when client work is slow? Do you enjoy off season or would you prefer to be busy year round?

Five Lessons from Film Photography Days

I have come across several photographers and clients recently who can barely remember film and film cameras. I feel fortunate to have lived through both the film photography and the digital photography eras.Soon there will be a generation who only grew up with digital. Technology changes have brought changes to photography, and made me think about my top five lessons from film photography days.

Film camera

We are getting to a time when many young photographers have never used a film camera

In the days of film, photography was different. I bought my first SLR camera in 1997. At that time, you planned how much film you could afford and could carry. The rolls came mainly as 36 exposure or 24 exposure. You were careful with how you used each exposure as you had a limited number and each one cost you money, both to buy the film and to have it processed. When you got your film processed it could be days, weeks, or months after you made the image. Wow, times have changed! Today, memory cards are cheap and have almost unlimited capacity. Images can be viewed on the back of the camera immediately. Often, images don’t ever get printed, they exist only in digital form. So, looking back on what I’ve learned, what are my top five lessons from film photography days?

(1) Consider Composition

In the film photography days, you had to carefully consider each image before you took it. With a limited amount of film, you had to make sure it lasted. With today’s cheap memory cards there is almost no limit on the quantity of images you can make. Sometimes this leads to an approach of shooting everything – summed up in that great description to “spray and pray”. Unfortunately this can lead to a large number of poor quality images. Lesson 1 – take the time to consider composition. It will improve your photography, and save you time reviewing and processing lots of poor quality images.

(2) Learn Faster

You had to wait for processing in the film era. This made it difficult to learn, as sometimes I could hardly remember actually taking the shot! Being able to review images instantly in the digital age gives us a great opportunity to learn faster. To make the most of this opporunity to learn faster, take the time after each shoot to review the images you have made and consider how you could improve them next time. Do this on your computer away from the shoot.

(3) Avoid Constantly “Chimping”

Chimping is that annoying habit of constantly reviewing your images on the back of your camera. In the film photography days, this option didn’t exist. Ironically, this helped the photographer engage with the subject and remain focused on creating great images. In effect, it kept you in the “creating zone” and didn’t allow you to drift into “reviewing mode”. If you are a photographer who checks the LCD screen after every image – think about not looking at it for a while, and staying engaged with the subject you are shooting.

(4) Get it Right In-Camera

Film

Film and film canisters used to be in every photographers bag. Now very few carry film.

Digital technology and the post production tools we have now give us great flexibility to adjust images after they have been made. Unfortunately this also leads some people to believe that the quality of the image coming directly out of the camera is less important now as they “can fix it in photoshop”. I hope you cringed as you read that. A bad image will still be a bad image after post production. A really good image straight from the camera, can remain a good image, or be enhanced further in post production. Don’t get lazy and expect your camera and post production tools to do everything for you. Learn your craft. Get it right in-camera and use post production tools to enhance, not fix, your images.

(5) Print Your Best Work

In film photography days, there were only prints or slides. Now it is very common for images to exist only in digital form. They can be shot on a digital camera, digitally enhanced in post production, and be used only on websites. If you have ever seen good quality images in print you will know how powerful prints can be. Think of family portraits in a home, wedding images hanging on walls for generations, and landscape images in corporate boardrooms. Take the time to print your best work. It will have an impact.

These are my top five lessons from film photography days. I don’t miss those days, but I feel lucky to have used film and digital technology. Did you live through the film photography era? What lessons did it teach you? Do you miss any aspects of that era?

Make the Most of Your Flash

Have you heard that your flash photography will improve dramatically if you use your flash off the camera? Believe me – it will. In this post I outline how to make the most of your flash by using it off camera.

So, how do we use the flash off the camera? In an earlier post I explained How To Use Flash Triggers (thanks to the readers who emailed me with positive feedback about that post). Flash triggers enable us to fire the flash when it is off the camera. With 3 other simple pieces of equipment you will be able to create images with soft, directional flash light. When you master this, you will really make the most of your flash!

Adapter

Attach the adapter to the top of the light stand

What equipment do I need? In addition to the radio triggers you will need:

  • a light stand
  • an adapter
  • a shoot through umbrella

First, you will need a light stand. This enables you to position the light at whatever height and distance from the subject you like. Second, you will need an adapter. This is the small piece of equipment which attaches to the top of your light stand. It allows the flash to sit on top of it. It also has a hole through it for the umbrella to fit in. Thirdly, you will need something to spread and soften the light. You can use a reflective umbrella or a shoot through umbrella. My preference is the shoot through umbrella as I find it enables better control of the light.

Flash

Attach the flash unit to the top of the adapter

How do I set it up?

(1) attach one of your flash triggers to the camera, and one to the flash
(2) set up your light stand
(3) attach the adapter to the connection point on top of the light stand
(4) attach the flash (with trigger attached) to the adapter
(5) thread the umbrella through the hole in the adapter

Now that you have this set up, you can position the light relative to the subject. If you don’t like how your subject is lit, move the light or adjust the power from the flash. Now, instead of being stuck with the flash on the camera, you can use your flash anywhere! This is how to make the most of your flash! (This is a one light setup, for additional light sources replicate the process for multiple lights).

What does it cost? This is a hard question to answer and depends where you live and where you like to shop! I live in Australia and buy most of my equipment at an online store. At that store there is currently a special offer which includes 2 radio triggers, a reflective umbrella, a light stand and an adapter, for A$140.

Off camera flash

The final set up

What next? To build on this lighting set up you can add a portable background. Once you have a background, you effectively have a simple, portable studio. I use this set up when doing corporate portraits in an office environment.

If you have questions about this set up, please feel free to add a comment to this post, or email me at craig@beyondhere.com.au

I hope this post has been useful and will encourage you to take the flash off the camera and make the most of your flash!