Category Archives: Gear Guide

Reviews of photography equipment

Set Copyright Information In-Camera

Modern digital cameras have the ability to set copyright information in-camera. This means that each image produced by your camera has the copyright information embedded in the EXIF data. This can be very handy if you plan to upload the images directly to social media without post processing, or you don’t want to do any post processing to the file, or if you lose the memory card and don’t want the images to be used by the person who finds it. (If they want to steal your images, technically they may still use them, but your name will be included in the EXIF data for each file which should act as a significant deterrent).

I am a Canon user, so the following images show how this is done on a Canon camera body. The model shown is a 7D, with the slightly fuzzy images (!) taken on my iphone.


Setting Copyright in camera

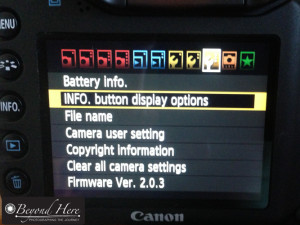
Image 1 – Select “Copyright Information” from the menu list.

So, how do we do this?

Step 1. First, press the menu button and scroll through the menu options until you find the one where you can see the words “Copyright Information”.

In the image displayed “Copyright Information” shows as third up from the bottom on this menu. Move down and select “Copyright Information”.

Setting Copyright in camera

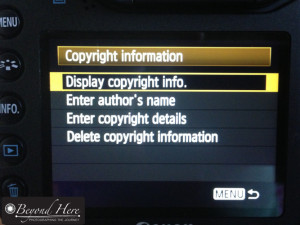
Image 2 – Gives you options for displaying both author and copyright details

Step 2. Once you have selected the “Copyright Information” you will see a menu like the one in Image 2. This is now  a straightforward process of following the prompts.

You can choose to set both an author and a copyright holders details. If you are shooting for hobby, or for yourself professionally, you will want both the author and copyright holder to be yourself. (If you want more information on when these might be different, add a comment to this post and I will explain). To add your name to these fields first select them and then follow the leads. For this example, lets say you want to add your name to the copyright. To do that select the “Enter copyright details” option.

Setting Copyright in camera

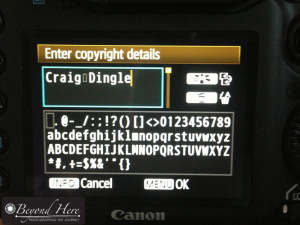
Image 3 – add your name by selecting the appropriate letters.

Step 3. In the final step in this process you will see a screen like the one shown in Image 3.

To add your name here, use the wheel and the button in the center of it (just out of screen in image 3 to the right) to select each letter.

Once you have completed this process, your name will appear as the copyright holder for each image produced by this camera.

If you are using an older Canon digital camera you can add your copyright details by using a slightly longer process. You attach your camera to your computer and open the Canon supplied software. You then find the place in the software’s menu and add your copyright details. This is slightly more complicated but only needs to be done once.

I have been a long time Canon user but assume Nikon, Sony, Olympus and other digital camera makes can do the same. For users of these brands, is that correct? I would be interested to hear. And is it an easy process like it is on Canon? Please add a comment with details of the camera model and process. Thank you.

Thanks for reading this post on how to set copyright information in-camera.


Five Lessons from Film Photography Days

I have come across several photographers and clients recently who can barely remember film and film cameras. I feel fortunate to have lived through both the film photography and the digital photography eras.Soon there will be a generation who only grew up with digital. Technology changes have brought changes to photography, and made me think about my top five lessons from film photography days.

Film camera

We are getting to a time when many young photographers have never used a film camera

In the days of film, photography was different. I bought my first SLR camera in 1997. At that time, you planned how much film you could afford and could carry. The rolls came mainly as 36 exposure or 24 exposure. You were careful with how you used each exposure as you had a limited number and each one cost you money, both to buy the film and to have it processed. When you got your film processed it could be days, weeks, or months after you made the image. Wow, times have changed! Today, memory cards are cheap and have almost unlimited capacity. Images can be viewed on the back of the camera immediately. Often, images don’t ever get printed, they exist only in digital form. So, looking back on what I’ve learned, what are my top five lessons from film photography days?

(1) Consider Composition

In the film photography days, you had to carefully consider each image before you took it. With a limited amount of film, you had to make sure it lasted. With today’s cheap memory cards there is almost no limit on the quantity of images you can make. Sometimes this leads to an approach of shooting everything – summed up in that great description to “spray and pray”. Unfortunately this can lead to a large number of poor quality images. Lesson 1 – take the time to consider composition. It will improve your photography, and save you time reviewing and processing lots of poor quality images.

(2) Learn Faster

You had to wait for processing in the film era. This made it difficult to learn, as sometimes I could hardly remember actually taking the shot! Being able to review images instantly in the digital age gives us a great opportunity to learn faster. To make the most of this opporunity to learn faster, take the time after each shoot to review the images you have made and consider how you could improve them next time. Do this on your computer away from the shoot.

(3) Avoid Constantly “Chimping”

Chimping is that annoying habit of constantly reviewing your images on the back of your camera. In the film photography days, this option didn’t exist. Ironically, this helped the photographer engage with the subject and remain focused on creating great images. In effect, it kept you in the “creating zone” and didn’t allow you to drift into “reviewing mode”. If you are a photographer who checks the LCD screen after every image – think about not looking at it for a while, and staying engaged with the subject you are shooting.

(4) Get it Right In-Camera

Film

Film and film canisters used to be in every photographers bag. Now very few carry film.

Digital technology and the post production tools we have now give us great flexibility to adjust images after they have been made. Unfortunately this also leads some people to believe that the quality of the image coming directly out of the camera is less important now as they “can fix it in photoshop”. I hope you cringed as you read that. A bad image will still be a bad image after post production. A really good image straight from the camera, can remain a good image, or be enhanced further in post production. Don’t get lazy and expect your camera and post production tools to do everything for you. Learn your craft. Get it right in-camera and use post production tools to enhance, not fix, your images.

(5) Print Your Best Work

In film photography days, there were only prints or slides. Now it is very common for images to exist only in digital form. They can be shot on a digital camera, digitally enhanced in post production, and be used only on websites. If you have ever seen good quality images in print you will know how powerful prints can be. Think of family portraits in a home, wedding images hanging on walls for generations, and landscape images in corporate boardrooms. Take the time to print your best work. It will have an impact.

These are my top five lessons from film photography days. I don’t miss those days, but I feel lucky to have used film and digital technology. Did you live through the film photography era? What lessons did it teach you? Do you miss any aspects of that era?

Make the Most of Your Flash

Have you heard that your flash photography will improve dramatically if you use your flash off the camera? Believe me – it will. In this post I outline how to make the most of your flash by using it off camera.

So, how do we use the flash off the camera? In an earlier post I explained How To Use Flash Triggers (thanks to the readers who emailed me with positive feedback about that post). Flash triggers enable us to fire the flash when it is off the camera. With 3 other simple pieces of equipment you will be able to create images with soft, directional flash light. When you master this, you will really make the most of your flash!

Adapter

Attach the adapter to the top of the light stand

What equipment do I need? In addition to the radio triggers you will need:

  • a light stand
  • an adapter
  • a shoot through umbrella

First, you will need a light stand. This enables you to position the light at whatever height and distance from the subject you like. Second, you will need an adapter. This is the small piece of equipment which attaches to the top of your light stand. It allows the flash to sit on top of it. It also has a hole through it for the umbrella to fit in. Thirdly, you will need something to spread and soften the light. You can use a reflective umbrella or a shoot through umbrella. My preference is the shoot through umbrella as I find it enables better control of the light.

Flash

Attach the flash unit to the top of the adapter

How do I set it up?

(1) attach one of your flash triggers to the camera, and one to the flash
(2) set up your light stand
(3) attach the adapter to the connection point on top of the light stand
(4) attach the flash (with trigger attached) to the adapter
(5) thread the umbrella through the hole in the adapter

Now that you have this set up, you can position the light relative to the subject. If you don’t like how your subject is lit, move the light or adjust the power from the flash. Now, instead of being stuck with the flash on the camera, you can use your flash anywhere! This is how to make the most of your flash! (This is a one light setup, for additional light sources replicate the process for multiple lights).

What does it cost? This is a hard question to answer and depends where you live and where you like to shop! I live in Australia and buy most of my equipment at an online store. At that store there is currently a special offer which includes 2 radio triggers, a reflective umbrella, a light stand and an adapter, for A$140.

Off camera flash

The final set up

What next? To build on this lighting set up you can add a portable background. Once you have a background, you effectively have a simple, portable studio. I use this set up when doing corporate portraits in an office environment.

If you have questions about this set up, please feel free to add a comment to this post, or email me at craig@beyondhere.com.au

I hope this post has been useful and will encourage you to take the flash off the camera and make the most of your flash!

How To Use Flash Triggers

Flash trigger

Flash trigger with flash attached

Do you want to learn to use your flash off the camera? And make a huge improvement in your flash photography? In this post we look at how to use flash triggers.

What are flash triggers? Flash triggers are small accessories which allow you to place your flash off your camera (they need to be within the triggers range). When you have learnt to use these, you will no longer be restricted to having the flash sitting on top of the camera. If you want the flexibility to create directional light with your flash – read on for how to use flash triggers.

How to use flash triggers?

Flash triggers are sold singly or in pairs. To get started, you need a pair of them. The flash is mounted on top of one trigger as in the picture on the right.

The other fits into the shoe on top of your camera – as shown in the second image.

These images show the flash triggers which I use – they are called Cactus Flash Triggers V5. A pair of these triggers currently costs A$90 at the online store I use.

Flash trigger

Flash trigger attached to the camera

What settings to use?

Each trigger has a small switch on the left hand side (see the image on the left and the picture below).

The trigger which sits on top of your camera needs to be set to Tx – which stands for transmitter. The one which has the flash on it needs to be set to Rx – which stands for receiver.

When you press the shutter it sends a message to the transmitter, which sends a pulse to the receiver, which then fires the flash.

Flash trigger

Set the trigger attached to the flash to Rx

There is a further switch on the right hand side of the trigger (not shown in the images here). It has a number which relates to a channel. Make sure you have both your transmitter and receiver set to the same channel so they can “talk” to each other. For example, set them both to number 7.

The flash triggers use standard AAA size batteries.

When to use flash triggers?

Flash triggers have many uses. I use mine most often in the studio for additional light, at weddings to create directional light, to light interiors when photographing rooms, and in my stock photography work.

I wrote an earlier post on how to create images with white backgrounds which makes use of flash triggers.

Has this post been useful to you? Has it demystified flash triggers and off camera flash? Has it given you confidence to give it a try? Do you have any questions about flash triggers?


How to Build a Home Photography Studio

In this post we cover how to build a home photography studio, based on my experience building one 18 months ago.

Step 1 – Space

How much space will you need? Most standard size backgrounds are 3m wide, so ideally you want a room that is wider than this. You will see in the photo, my room is about 3.2m wide at the ceiling and slightly wider at the floor (due to the odd shaped ceiling). How long the room is, is less critical. Any space more than 4m long will be plenty for most studio shots.

Step 2 – Backdrops

Your key decision with backgrounds is whether you want to use paper rolls which will need to be replaced over time, or an alternative. Paper rolls work really well where you do full length model images and have a hard floor.

My room is carpeted and I do very few full length shots. I chose to use muslin backdrops. These are readily available from studio photography stores or online.

Home photography studio

Home photography studio

Step 3 – Hanging the Backdrops

While you consider which type of backdrops to use, you also need to consider how you will hang them. A common choice is to buy a portable stand which they hang from. I didn’t go down this path as you need enough room to fit the legs of the stand in your room. That would have been wider than my room is.

I chose to put mounts in the ceiling and hang the backdrops on standard size curtain rods. The rods are 3.1m and the backdrops are 3m wide. The curtain rods are very affordable – A$9 each from my local hardware store.

The downside of this system is that the backdrops are not portable. (I have a separate “pop-up” backdrop which I use when I need a portable backdrop. I will save that for another post.)

The upside is that the mounts in the ceiling are very secure, and although you can’t see it clearly in the picture, it means I can hang 5 backdrops at once (one in front of the other).

Step 4 – Lighting

Step 4 is straightforward but potentially the biggest decision from a cost point of view. As you can see, I decided to get three lights, soft boxes, and stands. This gives me a variety of options for lighting a fairly small space. These are relatively inexpensive and low power. I was able to do this due to the small space, and to keep costs down.

I also use speed-lites with shoot through umbrellas when I need more lighting options.

Step 5 – Get to Work

It really is that simple to get started. Now that you know how to build a home photography studio, its time to get to work!

Do you already have a home photography studio? What were the key lessons from building it? If you haven’t built a home studio yet, do you have questions I can help with?

The “Go To” Lens

I have 4 lenses which I use for the bulk of my photography work – but one of them is the “go to” lens. It goes to nearly every assignment.

I use Canon L series lenses. They are Canon’s highest quality lenses and are recognizable by the red ring around the end of them.

The 4 lenses I mainly use are:

  • 50mm f1.2 This lens is always in my bag for weddings. It performs very well in low light situations like churches and reception venues.
  • 100mm macro f2.8 This is a versatile lens. I use it for macro images, some portraits, and quite extensively in my stock photography work. It is not just for macro images.
  • 24-105mm f4 This is a very useful and versatile lens. I use it for portraits, landscapes, and for stock photography.
  • 70-200mm f2.8 This lens gives great flexibility. I use it across a broad range of image types – from studio portraits to weddings to wildlife.

All 4 are very good lenses and provide options for making different types of images. That said, the 70-200mm lens is the “go to” lens. It is in my bag for nearly every photography job – weddings, studio portraits, outdoor portraits, and wildlife shoots. The zoom range gives flexibility, and being able to shoot at f2.8 lets me achieve fast shutter speeds with a narrow depth of field.

Canon lens

The Canon 70-200mm f2.8 lens

It is a great lens and I recommend it if you are serious about your photography. If you don’t use Canon equipment, don’t worry. All the major lens manufacturers have an equivalent lens. I’d recommend you check it out.

What are the trade-offs?

There are two trade-offs with the 70-200mm lens.

First, it is relatively expensive. The Mark II version with image stabilization is around A$2800. If that is out of the budget, consider a second hand Mark I version or a cheaper model with the same zoom range. A cheaper lens won’t have the same image quality but that may not be critical for you.

Second, it is quite heavy, at just under 1.5kg. Carrying this lens all day can be challenging.

When don’t I carry the 70-200mm?

I don’t carry the “go to” lens when I shoot corporate portraits at an office. These are typically small spaces not suited to this zoom range. In this case I use the 24-105mm lens.

What is your “go to” lens? Is there one lens that always goes in your camera bag? Why?