Category Archives: Photography Tips

Tips to improve your photography

Photography Tips Showing Part of the Scene

Here is the latest of my photography tips – showing part of the scene. Sometimes it is more effective to show only part of the scene to communicate emotion in an image.

This week I have been in Sydney. If you have never been to Sydney, it is worth the trip just to spend a few hours walking around Sydney Harbor. In less than one hour you can visit Darling Harbor, The Rocks, Sydney Harbor Bridge, Circular Quay, Sydney Opera House, and the Botanic Gardens. While you can do that in less than an hour – I recommend taking the camera and spending much longer.


Sydney Opera House

Part of the Sydney Opera House which accentuates the size of the sails

Visiting Sydney reminded me of two of my favorite images – both taken several years ago, and both of which provide a compelling image by showing part of the scene.

The image above was shot at dawn. I was standing opposite the Opera House using a 70-200mm lens. It was a grey cloudy morning, until the sky lit up in golden, yellow colors. The sun broke through the cloud for no more than 3 or 4 minutes. During that time, I was fortunate that a jogger ran up the steps and into this scene – highlighting just how big the sails are.

The second image (below) was shot at sunset. It is a closeup of people doing the Harbor Bridge climb. It was taken from in front of the Opera House looking across to the Harbor Bridge with a 70-200mm lens. Again, shooting only part of this scene gives a stark contrast between the huge metal bridge structure and the tiny human figures. The nice sunset helps as well!

Sydney Harbor Bridge

Tiny human figures doing the Sydney Harbor Bridge climb

Both of these images are good examples of showing only part of the scene to communicate a message. The contrast between the small human figures and the large architectural structures is really striking.

These images were both shot in the Sydney Harbor area. Do you have a favorite photo spot in Sydney?


How to Create Images with a Clean White Background

Human hand on white background

Number 1. Human hand on white background

This post looks at how to create images with a clean white background. This style of photography is ideal for:

  • adding images to a white page or website
  • photographing products to sell online
  • creating a clean, fresh look for your images
  • building a stock photography portfolio

So, what do we need?

1. We need a white or white-ish background. This can be a white wall, or sheet, or studio background. It can be anything as long as it is white or nearly white.

2. We need two light sources – one to light the subject and the other to light the background. This can be as simple as a window to let natural light fall on the subject and a flash or bright lamp to light the background.

3. A subject! Of course. And a camera! (And maybe some patience if you are doing this for the first time.)

Volunteer concept on white background

Volunteer concept. White background.

How do we create these images?

1. The images here are shot in my studio using a white, muslin backdrop. They have a set of studio lights to light the subject, and a flash to light the backdrop. I use a radio trigger to fire the flash. If you don’t have that equipment, don’t worry. Just make sure you have two light sources.

2. There needs to be distance between the subject and the background. In these images the subject is approximately 3 meters in front of the background. The flash is placed between the subject and the background, aimed at the background.

3. The light on the background needs to be brighter than the light on the subject. This is why a flash works well. It produces a very bright flash of light which makes your white background appear pure white. You can measure the light using a light meter if you have one. If not, use trial and error. If you are using a flash you will rarely need it on full power. I generally use one-half or one-quarter power on the flash.

Money laundering

Concept for money laundering on white background

If you are feeling overwhelmed by different light sources and power settings – don’t be! I have a friend who shoots this style of image using natural light, a single lamp, and a white wall in his house. He produces very clean images like the ones here – without any fancy equipment!

Once you have understood how to light the subject and the background independently it is very easy to create images with a clean white background. They are very useful for both web and print application and are used extensively by graphic designers. Subjects isolated on white backgrounds have been core material for stock photographers.

You can produce images like this too!


Photography Tip Look for Reflections

Here is a general photography tip, look for reflections to add depth to your photographs. Reflections can add a new dimension to your images and can make a bland image compelling.

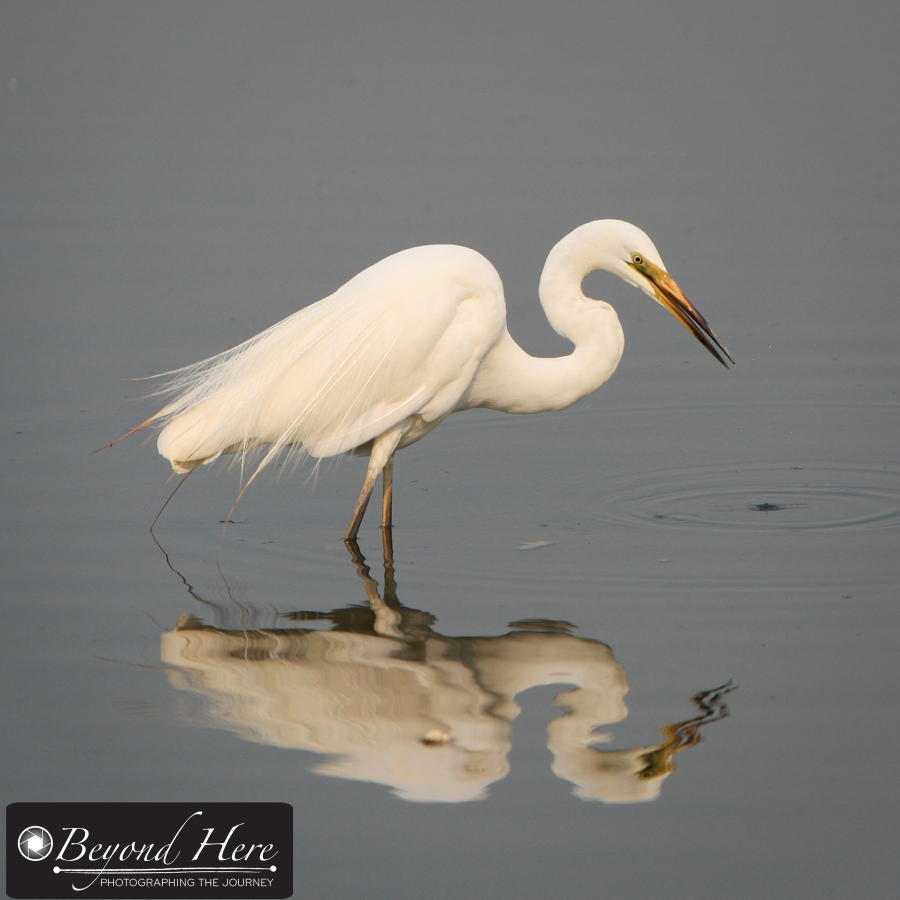
Below is an image I made at Albert Park Lake in Melbourne, Australia. This shot was taken early on a Saturday morning. There was no breeze, very still water, and high cloud. The cloud meant that the light from the sun was diffused and soft. The birds white color stood out against the darker color of the water. There were no distractions in the background or on other parts of the lake. The shape of the birds neck was very interesting, and the image was made much more compelling by the reflection of the bird in the water. Great!

Bird Reflections

White heron reflected in a lake

But it’s not every day that you get nice still conditions, a lovely still lake, no distractions in the background, and a cooperative heron!

So, where can you find reflections to add a new angle to your images?

My favorite places to use this technique are reflections in lakes, city buildings windows and building facades, puddles, trains and ferries, and sunglasses.

While this example is a wildlife image, this technique works equally well for other subjects. Think about these:

  • A bride reflected in the window of a wedding car
  • A street scene reflected in a city building
  • The Sydney Opera House reflected in the window of the ferry as you travel across Sydney Harbor
  • A football game reflected in a sideline puddle
  • The New York skyline reflected in your best friends sunglasses
  • Busy commuters reflected in the train window

The possibilities are endless.

It doesn’t matter whether you are shooting with the latest DSLR, your point and shoot camera, or your camera phone – this technique will still work well.

You can combine this tip with the tip to fill the frame with the subject for double the impact.

To help make average photographs outstanding, look for reflections.

Have you taken a great shot using reflections? What was it?

Portrait Photography Tips Fill The Frame

Do you want to improve your portrait photography? An almost universal rule for taking more compelling portrait images is to fill the frame with your subject. That means getting closer to the subject (or zooming in closer) so that the subject entirely fills the frame.

It doesn’t matter whether the subject is people, animals, or objects – fill the frame with the subject for more interesting images. This can feel a little funny at first, particularly as you move in closer than you normally feel comfortable. Push through the discomfort – it will be worth it and your portrait photography will benefit.

I find the best way to do this is to stand much closer to the subject than you normally would. If you are feeling uncomfortable, like someone is in your personal space, then you are in the right spot.

Why does this work?

Filling the frame with your subject creates more compelling images because:

  • it focuses the viewer completely on the subject, and
  • it removes any distracting background elements

Show me an example!

Portait where the subject fills the frame

Portait where the subject fills the frame

Here is an example of a children’s portrait.

It was shot indoor, with a large glass window behind me. The window was not in direct sunlight, so it was producing very soft natural light across the subject. The room contained furniture and children’s toys. These are normal elements in a home with children but they have the potential to distract your viewer if you include them in your image.

In this case, although I was using a 24-105mm lens, I didn’t need to use the zoom right to the 105mm end of the range. I was close to the subject and managed to fill the frame completely with the subject. The result – a simple compelling portrait photograph (which doesn’t show the clutter and mess in the room around them.)

This is one of my favorite portrait photography tips.

How do you find standing close to the subject and filling the frame? Do you find it more effective to position yourself close to the subject, or a little further back with some zoom?


Urban Wildlife

Do you feel like you have to travel to exotic places to create great images?

My commitments in my home town (Melbourne, Australia) forced me to find photography opportunities close to home – and I’m glad they did.

Urban Wildlife

Grey headed flying fox

In Melbourne, there are opportunities to shoot architecture, city life, sporting events, city scapes, and lifestyle images. I’ve also found some outstanding wildlife urban wildlife locations, even in a city of 4 million people!

Here are 2 shots from some of my favorite places.

First, there is a large colony of grey headed flying foxes at Yarra Bend – roughly 7 kilometres from the city centre. They are spectacular animals and are relatively easy to photograph. This shot is taken with a 70-200mm lens and a fast shutter speed (1/8000s at f3.5) to freeze the action. I love the way you can see the veins in the wings. Spooky.

Second, at Albert Park Lake, there are cockatoos and corellas which visit year round. This shot was taken next to the golf course – a regular haunt for the cockatoos! Albert Park Lake is just a short walk from the city centre.

Urban Wildlife

Cockatoo in Flight

What are the great urban wildlife opportunities close to your home? Please leave a comment, I’d love to hear what opportunities you are finding.